Formatting Your Document with Word 97
What you will learn from this lesson
With Word 97 you will:
- Format text.
- Format paragraphs.
- Create, apply, and modify styles.
- Set tabs.
What you should do before you start this lesson
Start Word 97.
Open a new document.
Exploring the lesson
Using Word 97, you can change your document’s format to make it more interesting and engaging.
Formatting text
Word 97 can help you enhance your documents by adding style, emphasis, and greater readability.
Changing text with shortcut keystrokes
Changing plain text into bold, italic, or underlined
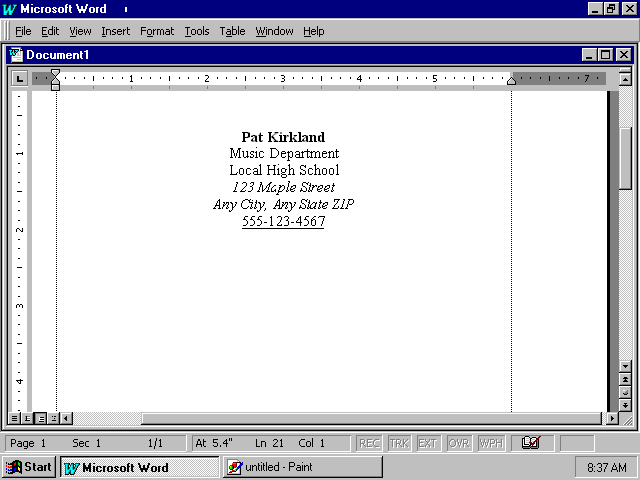
- Type your name, address, and phone number on separate lines.
- Select your name.
- Press ctrl+b.
- Select your address.
- Press ctrl+i.
- Select your phone number.
- Press ctrl+u.
Changing text with the formatting toolbar
Formatting text to be right-aligned, left-aligned, and centered
With the document from the previous lesson, move the mouse pointer over the Format toolbar buttons to review their functions.
Press ctrl+a.
On the Formatting toolbar, click the Align Right button.
On the Formatting toolbar, click the Align Left button.
On the Formatting toolbar, click the Align Center button.
Changing font size with shortcut keys
Changing the text font size
With the document from the previous lesson still open, press ctrl+a.
Press ctrl+] until you increase the font size to 60.
Press ctrl+shift+d, type 18, and then press enter.
Close your document without saving changes.
Changing line spacing with the Formatting toolbar
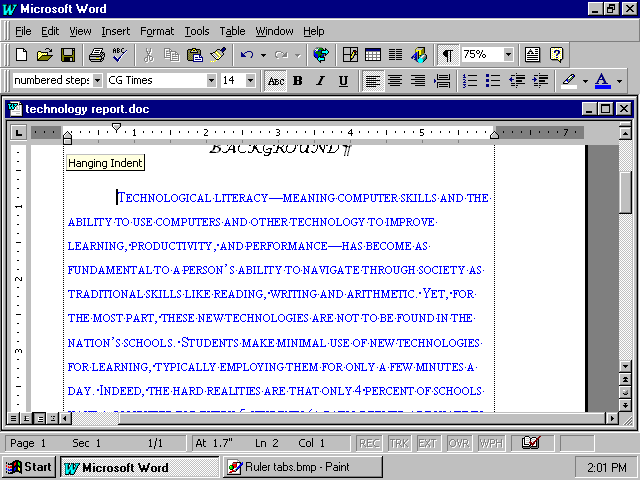
Changing line spacing and adding hanging indents
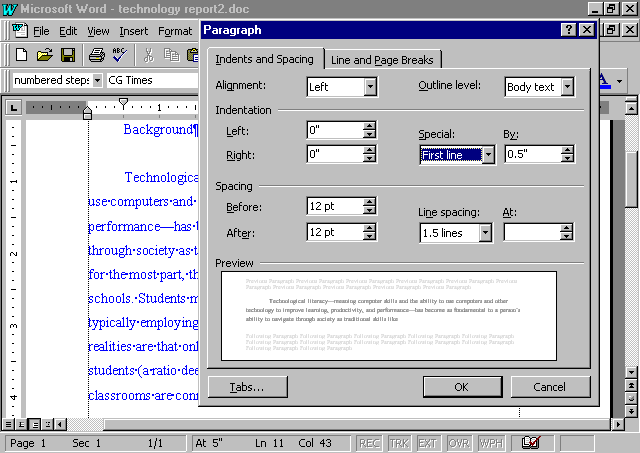
Open your Technology Report document.
Click anywhere in the paragraph.
On the Format menu, click Paragraph.
Click the Indents and Spacing tab.
Under Indentation, click the arrow under the Special box, and then click First line. In the By box, enter 0.5.
Under Spacing, enter 12 pt in the Before and After boxes.
Under Line spacing, click 1.5 lines.
Click OK.
Changing your document with styles
You can modify the look of your document by applying separate, individual styles. Word 97 makes it easy to create a document that has a consistent look throughout. You and your students can create titles, headings, subheadings, body text, and so on by applying styles. A style contains information about the indentation, character formatting (bold, italic, and so on), and paragraph formatting of the text to which it is applied. Styles help your students see how consistency improves the appearance of their reports.
Using built-in styles
Adding styles to text
With the Technology Report document from the previous lesson still open, click anywhere in the paragraph.
On the Formatting toolbar, click the arrow next to the Style box.
From the drop-down list, click one style at a time to apply it to your paragraph.
Click Undo after each change.

Creating your own styles
Establishing your own styles
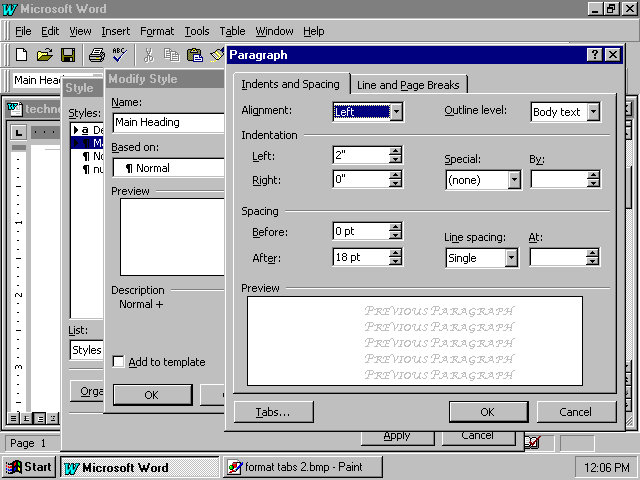
With the Technology Report document from the previous lesson still open, on the Format menu, click Style.
In the Styles box, click Normal, then click New.
In the Name box, type Main Heading, then click Format.
On the Format window, click Font, then click the Font tab.
In the Font dialog box, click Lucida Calligraphy, or choose a font.
In the Size dialog box, click 18 or type 18.
In Effects click Small caps, then click OK.
In Modify Style, click Format, then click Paragraph.
In Indentation, in the Left dialog box click arrow up to 2, or type 2”.
In Spacing in the After dialog box, type 18 pt, or click arrow up to 18.
Click OK, click OK again, then click apply.
Working with tabs and paragraph indents
Adding styles can be a complex process. What if you just want to indent a single paragraph? Indents or tabs can be used in many different ways. There are five tab types. These are:
- Right
- Left
- Centered
- Decimal
- Bar
If you set tab stops as you enter text, and the press enter, the tab settings are carried forward to the next paragraph. However, if you add tabs later, they apply only to those paragraphs selected when you set the tabs.
Setting tabs with the Tab command
Formatting with the Tab command.
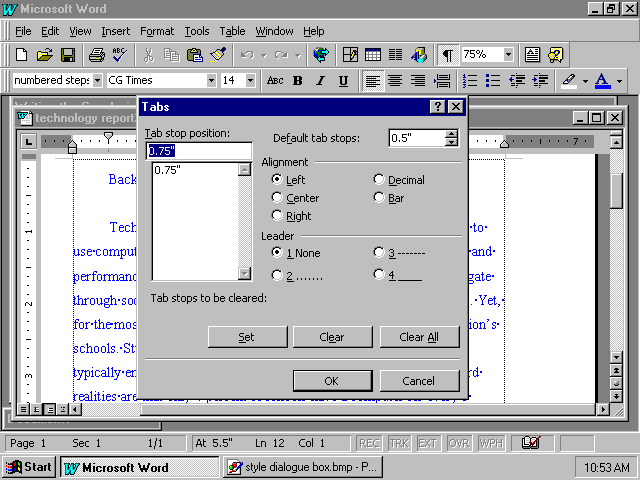
- With the Technology Report document from the previous lesson still open, on the Format menu, click Tabs.
- In the Tab Stop Position box, enter 0.75.
- Click Set.
- Click OK.
- Position the insertion point at the beginning of any line, and press tab. Note the effect this has on your paragraph.
You can quickly change tabs directly on the screen. The tabs are marked with “arrows” on the horizontal ruler. Position the tab markers on the ruler to make quick changes to tabs.
Formatting tabs with the ruler
Formatting tabs with the ruler
- With the Technology Report document from the previous lesson still open, locate the tab marker on the ruler.
- Click the tab marker, and drag it to the 1-inch mark.
- Position the insertion point at the beginning of the first line of the paragraph, and press tab.
- Click Undo twice.
If you want to change the indentation for an entire paragraph, use the indent markers. The First Line Indent marker controls where the first line of a paragraph starts. The Hanging Indent marker controls the indentation of all the lines of a paragraph except for the first line—that is, the hanging indent. The Left Indent marker controls the indentation for the entire paragraph.
Setting indentation with the ruler
Changing the paragraph indentation
- With the Technology Report document from the previous lesson still open, click the First Line Indent marker (the top arrow on the ruler), and drag it to the 1-inch mark.
- Click the Hanging Indent marker (the bottom arrow on top of the box), and drag it to the 1-inch mark.
- Click the Left Indent marker (the box below the bottom arrow, and drag it to the 2-inch mark.
- Close your document without saving changes.
How you can use what you learned
You can show your students by example and by instruction how styles and standards improve the quality of their written work. By encouraging them to use consistent formats for a particular assignment, you promote their awareness of presentation. Furthermore, evaluation is easier for you when you can focus on commonly presented elements that a standardized format permits.
Extensions
With Word 97 you can use special effects both in print and on screen to increase interest and appeal in your document. When you send out memos online to colleagues, parents or students, you can animate the text with sparkle, moving borders, blinking text and shimmering. If you present a lesson on the computer, you can highlight headlines or other important text and make them stand out with animation.
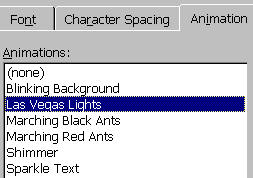
Changing text with animation
Changing selected words into blinking lights
- Open your Technology Report.
- Select the heading “Background.”
- On the Format menu, click Font.
- Click the Animation tab.
- From the Animation list, select the effect you like, such as Sparkle Text.
- Click OK, then click Undo.
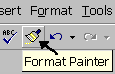
When you create a format that you like, you can easily copy it with the Format Painter button on the toolbar.
Copying text formatting
Copying text formatting
- With your Technology Report document still open from the previous lesson, select the “Background” heading, and press ctrl+u.
- Click the Format Painter button on the Standard toolbar. The mouse pointer changes to a paintbrush.
- With the paintbrush, “paint” the first line of the text.
- Close the document without saving changes.
Summarizing what you have learned
Through this chapter, you have explored and practiced:
- Formatting text.
- Formatting paragraphs.
- Modifying or creating styles.
- Setting and moving tabs.
- Indenting paragraphs.
- Adding special effects to text.
- Using the format of one area of text to paint another.