Getting Connected
Chances are your classroom computers and the computer labs that you have access to are connected to a network through which you communicate with people throughout your school and the worldwide community. Even without a network, you can easily gain access to the Internet with a modem and an Internet Service Provider account or online service such as MSN™.
With Windows 98 it is now easier than ever to connect to the global community. Windows 98 provides you with everything you need to take full advantage of the Internet, including Outlook Express e-mail, FrontPage Express for creating your own Web pages, and the Internet Explorer Web browser.
What is a Network?
A network is a group of two or more devices, such as computers, printers, and scanners, that can communicate and share files with each other. Devices on the network are often referred to as workstations, and each runs a networking program that enables the device to communicate with the other devices on the network and the server, a central computer that controls the network. (The server also stores files and programs and routes data between workstations, among other tasks.) In order to use the network, you are usually required to connect to it, or log on, using a user name and password. The software on the server verifies that the user name and password are correct, and then grants you access to the network and the information on it.
Once you are logged on to the network, you can store files, share them with other people, or use other network devices such as printers and scanners. For example, you can create a worksheet for students to access and complete online. You can also send e-mail to other people on the network if your network has an e-mail program installed. If your network server has an e-mail program and Internet software installed, you can send e-mail to people outside the network, like educators with whom you collaborate on research, and you can search for information on the World Wide Web. To connect to the World Wide Web, you must use the Internet connection on your network, or you must use a dial-up connection if you are not on a network or you are at home.
Connecting to the World Wide Web
One of the most prominent ways of doing research and communicating with other people is using the World Wide Web. The World Wide Web is a collection of all of the Web sites available on the Internet. A Web site is a collection of Web pages in a given location, and it is often for a particular organization such as a company, an educational institution, or a non-profit group. The address, or URL, of the Web site will tell you what kind of organization has posted the site. The URL for a commercial site will end with .com, an educational institution with .edu, and a non-profit group with .org.
A Web page is a file that can contain text, pictures, and other multimedia. The Web is an exciting medium for students because it creates a dynamic and interactive learning environment. Web pages often contain links to other Web sites. A link is a word or a picture that, when you click on it, takes you to another place on that Web page, another Web page, or another Web site.
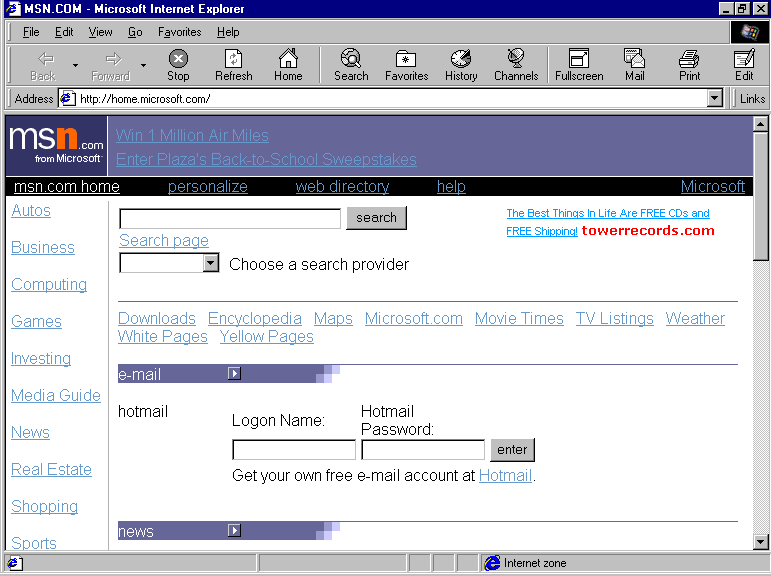
To connect to the World Wide Web using an Internet connection on your network, you must access the network and then open the browser on your computer. The Microsoft Internet Explorer 4.0 browser is an integrated component of Windows 98. When the browser opens, you see your default home page, from which you will always start your searches. You can go to other Web pages by clicking links on the Home page or by typing the address to a Web site in the Address bar, which is usually located at the top of the browser window.
To open the browser window and load a Web page
Click the Launch Internet Explorer Browser button on the Quick Launch toolbar located on the taskbar. The browser window opens. If you are using a dial-up connection, the Dial-Up Connection dialog box appears.
Connect to your Internet Service Provider if necessary by entering your username and password.
Once connected to the Internet, the browser will load your default home page. You will see the URL (uniform resource locator, otherwise known as a web address) for the Web site in the Address bar. The following illustration shows the MSN home page.
Navigating the World Wide Web
You have already discovered how easy it is to navigate through files and folders on your computer with the Web style desktop. Despite the vast amount of information on the World Wide Web, navigating it is just as easy. Each of the features discussed below will help you find what you need (and probably some unexpected surprises) on the Web.
Toolbars
With Microsoft Internet Explorer 4.0, you have the familiar Menu bar, Standard toolbar, Links toolbar, and Address toolbar. The following buttons are on the Standard toolbar:
- Back
and Forward—return to pages you have just visited. You can select from a drop down list of recently visited pages.
- Stop
—stop the computer from loading a page.
- Refresh
—reloads the current page.
- Home
—return to your default home page (the page that loads first when you start Internet Explorer.
- Search
—opens the Explorer bar so you can do a keyword search of the Web.
- Favorites
—opens the Explorer bar and displays your favorites folders, including Web subscriptions.
- History
—opens the Explorer bar and displays a list of all of the Web pages that you have visited recently. You can set your computer to delete this history at a regular time interval like every day, or once a week. You can also manually delete the history, just right-click on the day you want to delete and choose Delete.
- Channels
—displays the Active Channel™ Web content guide in the Explorer bar.
- Full Screen
—uses more of the desktop to display the page. Only the Standard toolbar is shown.
- Mail
—opens your e-mail program so that you can check for new messages, or email the page or a link to it.
- Print
—sends the current page to your default printer.
- Edit
—opens the current page in your Web page editor (such as FrontPage Express, the Web page editor that is a component of Windows 98).
Explorer Bar
When you click the Search, Favorites, History, or Channels buttons the Explorer bar will appear in the left pane of the browser window. The Explorer bar displays the contents of whichever button you have chosen. For example, the Search button will display the search engine of your choice. To close the Explorer bar, click again on the button you used to open it.
Status Bar
The Status bar at the bottom of the Internet Explorer window is a helpful way to keep track of what the browser is doing. The Status bar shows you the following information:
- A description appears when you select a command from the Menu bar.
- The target address (URL) appears when you point to a link.
- Status icons such as the security padlock and the printer appear on the right.
Finding Information on the World Wide Web
The amount of information on the Web is vast and can be overwhelming. Since there is no possible way to know every address of every Web site you might want to visit, your browser includes the capability to search for key words and phrases, just like the computerized catalogs at libraries.
Internet Explorer 4.0 has a Search button that, when clicked, opens a Search pane in the Explorer bar from which you can access several search engines. A search engine is a program on the Internet that allows you to search for the key words for a topic, or to search a broad category, such as science, for Web sites that interest you. When you type in a key word and start the search, the search engine finds the Web sites that contain the chosen key word. Key words can be very general or more specific. For example, you might search for "botany," which is very general, or "tropical plants" or "ferns" which are more specific. However, general key words will probably return a long list of Web sites; you may want to use a more precise key word to return a more focused list.
To search using a key word
On the Standard toolbar, click the Search button. The search pane opens on the left side of the window.
Click on the down arrow to the left of the Search provider box to display a list of search engines.
Click on a search engine name such as Yahoo. The Yahoo! search engine opens in the left pane.
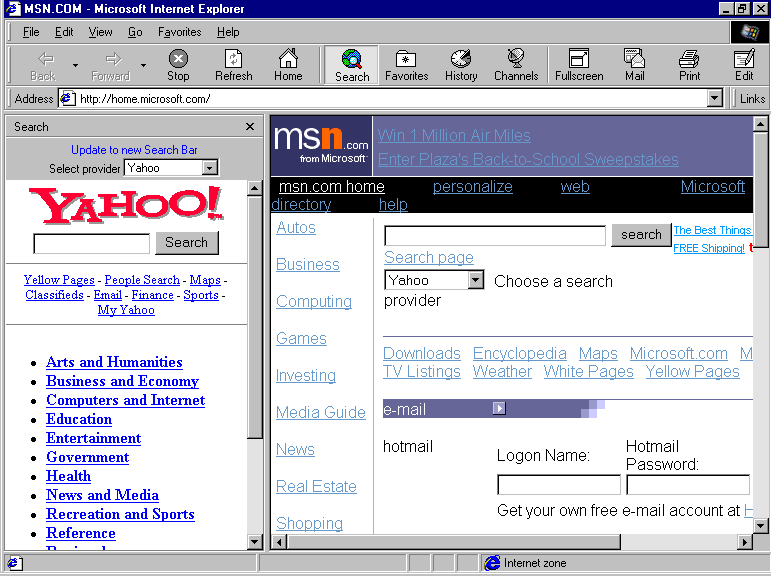 Type a keyword or phrase in the search box. Use quotations if you want the search engine to search for the entire phrase, such as “carnivorous plants,” otherwise the search engine will return pages with any of the search terms in the Web site, or all sites containing “carnivorous” and all sites containing “plants.”
Click the Yahoo! Search button.
Yahoo! will return a list of Web site links containing the keyword or phrase. Click on any link that is of interest.
To view the Web site in the entire window, click Search to close the Explorer bar. Click Fullscreen to display the page in even more of the screen.
Subscribing to a Web Page
Another characteristic of the World Wide Web is that it is dynamic; information is changing all the time. Some Web sites are updated on a regular basis—weekly, daily, even hourly—while others may go for months without changing. You may find Web sites you will want to revisit when information has been changed or updated. If you want to be notified when something on a Web site changes, you can subscribe to the Web site. Unlike subscriptions to journals or periodicals, Web subscriptions do not cost money; they are only requests for notification when a site has been updated.
When you subscribe to a Web page, your browser checks the Web site, at an interval you choose, to see if changes have been made to the page since your last visit. If changes have occurred, the browser can notify you by e-mail and copy the page to your computer. You determine which options you want for each subscription.
To subscribe to a Web page
In either Internet Explorer or Windows Explorer, open the Web page that you want to subscribe to.
Click Favorites on the menu bar and then click Add to Favorites. The Add Favorites dialog box opens.
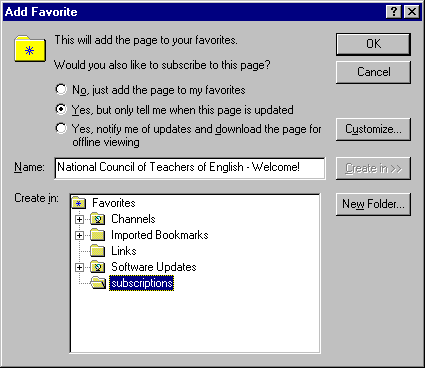
Choose an option. To subscribe to the web page, select one of the Yes options, depending on if you want to view the page offline.
Click the Customize button.
- If you have not chosen to view the page offline, you have the option of receiving e-mail notification when the page is updated.
- If you have chosen to download the page for offline viewing you can set the time intervals that you want the page to be downloaded and request e-mail notification.
- Click the Create in>> button. The dialog box expands to show the available folders. Click on a folder to open it, or click the New Folder button to create a new folder to store the subscription in.
- Click OK.
The page is stored as a link in the folder you have placed it in. When the page is updated, the link icon for the page will gleam red.
To update automatically or change a subscription
Click Favorites on the Menu bar and then click Manage Subscriptions. The Subscriptions window opens. Your subscriptions are listed in the right pane.
Click View and select Details to show the subscription details including last update time and next update time.
Select the subscription you want to update or delete by pointing to it (or click on it if you are using the classic style desktop).
- To delete the subscription, click the Delete button. A dialog box opens. Click Yes to confirm the deletion.
- To update the subscription, click the Update button. A dialog box opens and displays the download progress. This box closes automatically when the update is complete.
To update all subscriptions at once, click the Update all button on the standard toolbar, or, click Favorites on the menu bar and then click Update All Subscriptions.
Adding Active Content Items
Active content is information from the World Wide Web that constantly changes. When you choose the View As Web Page option for your desktop, the channel bar appears. The Channel bar is your “remote control” to active channels, Web sites which change content on a regular basis. You can choose from over 3000 active channels, and add icons for those you want to use on your channel bar.
You can search for active channels of interest to you and other active content from the Microsoft Media Showcase gallery.
To add an Active Channel to your channel bar
Click Channel Guide on the Channel bar. The Microsoft Windows Media Showcase opens.
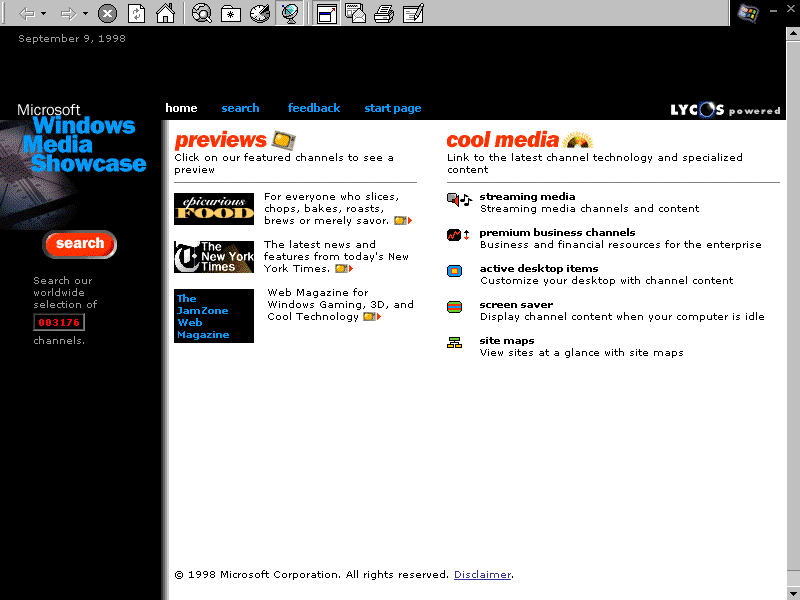
Click the red Search button on the Media Showcase web page.
Follow the directions on the page to search for Active Channels and other media of interest to you.
Your search results will be displayed as logos on the left side of the window. Click on a logo to preview the active channel.
To add the channel to your Channel bar, click the blue Add Active Channel button.
To add active media to your desktop
Click the Start button to open the Start menu.
Point to Settings, point to Active Desktop, and then click Customize My Desktop. The Display Properties dialog box opens with the Web tab displayed.
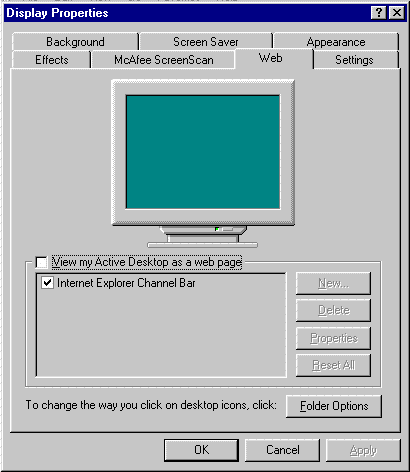
Click New. The New Active Desktop Item dialog box asks you if you want to connect to the Microsoft Active Media Gallery on the World Wide Web.
Click Yes. You will need a network or dial-up connection to the World Wide Web to complete this activity. The Internet Explorer browser will open and load the Active Media Showcase web page.
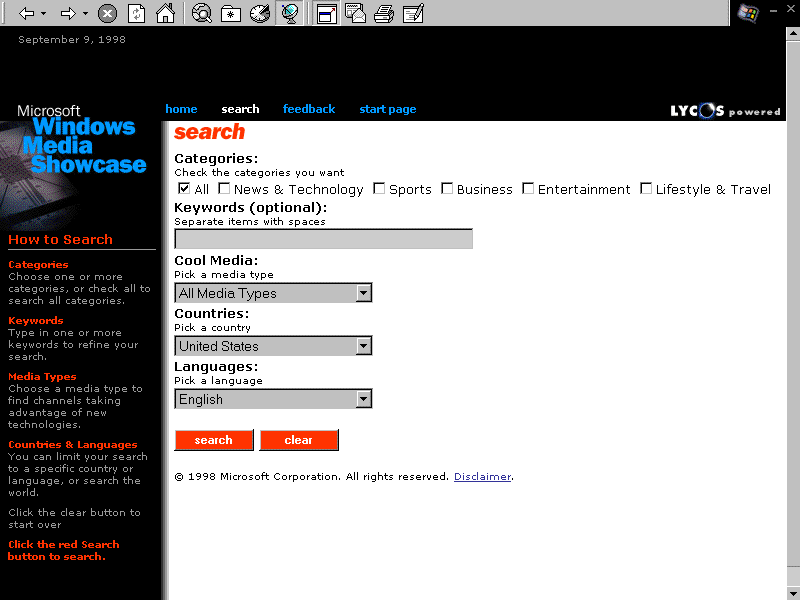
Select your search criteria and enter a key word and then click the red Search button.
The search results will be displayed as logos on the left side of the window. Click a logo to preview the active channel and active content item.
Click the orange Add Active Content button to add the item to your desktop. You can hide items you have added to your desktop from the Web tab of the Display Properties dialog box. Active content desktop items will update regularly while the computer is connected to the Internet through a dial-up or network connection.
A Word About Security
There has been quite a bit of discussion about privacy and security of information sent over the Internet. When you send information over the Internet, it might be passed through several computers before it reaches the recipient’s computer. If your information passes through another computer, it could be seen by someone other than the person you intended. When you are about to send information to the Internet Zone, a security alert message will open to remind you of this possibility.
Some companies conducting business over the Internet provide secure sites for people to transmit private information such as credit card numbers. When a site is secured, information that you send is encrypted and can’t be read by other people. If a site is secure, its address (URL) will start with “https.” Also, a padlock icon will appear on the gray Status bar at the bottom of the browser window.
Using Outlook Express
Electronic mail, or e-mail is quickly becoming one of the most widely used forms of communication in the world. It is fast, convenient, and does not cost anything in addition to the normal charges associated with the Internet connection. Using e-mail, you can send a simple text message like a reminder about an assignments, or you can send a message with other files attached to it, such as a grade report created in Microsoft Excel or a worksheet created in Microsoft Word that a student may have missed. The message can also contain links to other e-mail addresses or Web sites, so you can send students Web pages that you want them to look at. With a microphone, you can even send voice messages!
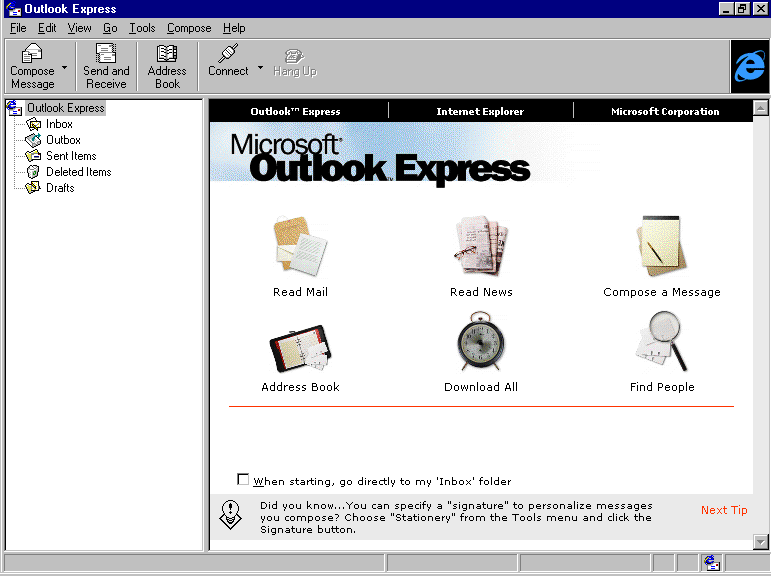
Outlook Express is the e-mail program that comes with Windows 98. To open the program, click on the Outlook Express desktop icon or Quick Launch button. When you open Outlook Express, the left side of the window, called the Folder pane, displays the various folders in the program used to receive, send, and store e-mail messages. The right side of the window displays several shortcuts to the different tasks you can do: Read Mail, Read News, Compose a Message, Address Book, Download All, and Find People. The following illustration shows the Outlook Express window.
Sending a message
You can send a message to a person by typing in his or her e-mail address in the To box. Or you can use an address stored in your electronic address book. With Outlook Express you can also create e-mail messages on designer backgrounds called stationery.
To compose and send a message
Start Outlook Express.
On the standard toolbar, click the Compose Message button and then click on a stationery type, browse for other or custom stationery, or click No Stationery to send the message on a white background. The New Message window opens.
In the To field, type the e-mail address of the person to whom you are sending the message. If you are sending to more than one person, type a semicolon (;) after the e-mail address.
- or -
Click the To button to open your address books. Select an address book, and double-click a name. The address moves to the To Message Recipients field.
Repeat step 3 to add more e-mail addresses to the To field.
To CC (carbon copy) someone (optional), click in the CC field. Type the
e-mail address in the field, or click CC, choose an address from one of your address books, and click OK. Repeat to CC other people.
To blind CC someone (CC someone without the other message recipients knowing the person received the message) (optional), click in the BCC field. Type the e-mail address in the field, or click BCC, choose an address from one of your address books, and click OK. Repeat to blind CC other people.
To add a subject line to the message, click in the Subject field and type a brief line regarding the subject of the message.
Click in the blank field below the Subject field and type your message.
When you are satisfied with your message, click Send. The message automatically moves to your Outbox folder and you return to the main Outlook window.
If you are always connected to the network and Internet connection, your message is automatically sent.
- or -
Click Send And Receive to connect to the Internet connection and send the message.
When the message has been sent, it moves to the Sent Items folder. If the message cannot be delivered to someone, you will usually, but not always, receive an automatic reply letting you know who could not be reached and why.
Attaching a file to a message
Sometimes you need to add information to an e-mail message that would be too time consuming or inconvenient to retype in the message. For example, if you had a school newsletter you wanted to send to parents or a class schedule you needed to send to students, it would not be convenient to retype the information when it already exists in another document. In these types of situations, you can attach an electronic copy of the document to your e-mail message.
When you attach a file to an e-mail message, keep in mind that the recipient must have a program that can read the file. For example, if you attach a Word 97 file to the message but the recipient only has Word 7 or Corel WordPerfect, the recipient won't be able to open the attachment.
To attach a file
In the Outlook Express program, address the e-mail message. (See "To compose and send a message" above.)
Type a message in the blank message field below the Subject field (optional).
Position the cursor in the message field where you want to insert the file. This can be at the beginning, at the end, or anywhere in between.
On the Insert menu, click File. The Insert File dialog box opens.
Locate the file you want to attach. Click the file and click OK. An icon representing the file labeled with the file name appears in the message.
To insert other files, repeat steps 4 and 5.
Send the message as you normally would. (See "To compose and send a message" above.)
Receiving and reading a message
When Outlook Express receives messages, it stores them in your Inbox folder. The number next to the word Inbox on the left side of the window tells you how many messages are waiting for you. If there is no number, you have no new messages.
When you click the Inbox folder on the left side of the window, the contents of the folder are displayed on the upper, right portion of the window, which is called the Message List pane. The Message List pane shows the subject and author of the messages in the Inbox. If a message header is bold, that message has not yet been read. If the message header is not bold, the message has been opened.
The lower right portion of the screen is called the Message Contents pane, and it shows you a preview of the message selected in the Message List pane. This feature allows you to scan the message contents to see if and when to read that message. To preview the contents of another message, just click another message header in the Message List pane.
To receive and read messages
Open the Outlook Express program.
If you are always connected to the network and the Internet connection, any messages sent to you are automatically received to your Inbox folder, and, if you have new messages, an envelope icon appears in the taskbar.
- or -
Click Send And Receive. The computer connects to the Internet connection and tries to retrieve your messages to your Inbox folder. (It also sends any messages in your Outbox folder.)
In the Folder pane, click your Inbox folder. If it has a number next to it, you have new or unread messages. New and unread messages appear in bold in the Message List pane.
To read a new message, click it in the Message List pane. The contents of the message are displayed in the Message Contents pane.
Double-click the message. The message opens in its own window.
When you are finished, you can close the message, and it remains in that folder.
You can also do other tasks with the message, such as delete it, reply to it, or save it to another location on your computer or the network. For information on these and other options, see the documentation that came with the Outlook Express program, or Outlook Express Help.
Adding e-mail addresses to the address book
If you frequently e-mail the same information to the same people, you can also build distribution lists. For example, you might build a distribution list of all the students in your class or all of the parents of the students, a list of conference participants for a conference you are organizing, or a list of other educators with whom you share a research interest. Then, when you need to e-mail something to everyone in the group, such as a permission slip, an agenda, or an interesting Web site link, you can choose the distribution list name from your address book instead of each address separately.
To add e-mail addresses to the address book
On the Tools menu, click Address Book.
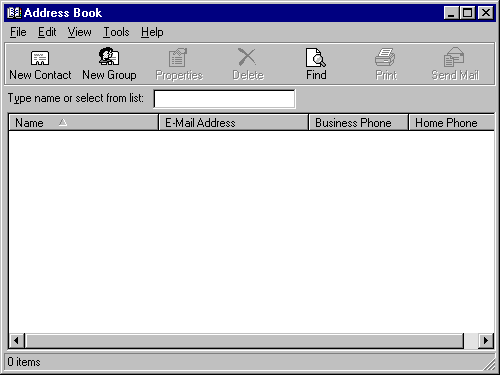
On the File menu, click New Entry. The New Entry dialog box opens.
From the Select the entry type field, choose the type of address the new recipient has. If you do not know the type, choose Other Address.
In the Put this entry box, the In the radio button should be selected. From the list, select the address book to which you want to add the new address and click OK.
In the dialog box that opens, fill the fields with the appropriate information. (If you do not know some of the information, contact your system administrator.) When finished, click OK.
Repeat steps 2 through 5 to add more addresses.
When finished, close the Address Book dialog box.
To build a distribution list
On the Tools menu, click Address Book.
On the File menu, click New Entry. The New Entry dialog box opens.
From the Select the entry type field, click Personal Distribution List and click OK. The New Personal Distribution List Properties dialog box opens.
On the Distribution tab, type a name for the distribution list in the Name field.
Click Add/Remove Members.
In the Show the names from the list, select the address book from which you want to copy addresses into the distribution list. A list of the addresses in that book appears in the left side of the window.
To add a name to the distribution list, select it in the list on the left and click Members. The address moves to the right side of the window.
To remove a name, select it on the right side of the window and press Delete.
Repeat steps 6 through 8 to add and remove other addresses in the list.
When finished, click OK. You return to the New Personal Distribution List Properties dialog box, and the members of the list appear in the window.
Click OK to close the dialog box. Then, close the address book.
Discussion Groups
Another way to communicate with others in the global community is through online discussions. There are two types of discussions: real time and bulletin boards. In real time, discussions are interactive. You type messages that the other participants can immediately see and answer. “Chat rooms” are an example of real time discussions. Bulletin boards are ongoing postings that anyone can read and reply to at any time. News groups are an example of bulletin board discussions. You can find both chat rooms and news groups of interest to you through an online service such as MSN. You may also find discussion groups of interest as you search the Web. For bulletin board discussion groups that you find on the Web, you will be given directions to subscribe to a “list” by sending a simple e-mail message. You will then receive messages posted to the bulletin board in your e-mail. Bulletin boards are an excellent way to keep up with current discussions about topics of interest to you. You can find discussion groups on everything from Renaissance literature to bioethics to service learning. Encourage your students to subscribe to and post messages to appropriate bulletin boards; it is an excellent way for them to share the knowledge they are gaining in the classroom.
Putting it Together
Now that you have learned how to communicate with the global community and bring the World Wide Web to your desktop, you can try the following ideas to get the most out of being connected in and out of the classroom:
- To teach Internet searching skills, create a World Wide Web “scavenger hunt” on a relevant topic.
- Share lesson plans with teachers from all over the world! There are several Web sites that catalog lesson plans for all grade levels and subjects. Two good ones are:
- AskERIC http://ericir.syr.edu/virtual/lessons
- ENCARTA® online http://encarta.msn.com/schoolhouse/default.asp
- Subscribe to the Microsoft Education Web page and be automatically notified when new information for educators about using Microsoft products and services in the classroom is added. While you are there, sign up to receive the Microsoft Education K-12 or Higher Ed newsletters through e-mail.
- Have students observe and make calculations and predictions about local weather patterns. Find a weather map active content item to display on the Active Desktop. Share your data with students in another geographic region through e-mail or a class Web page.
- Have students participate in mock stock exchange games to teach economic principles. Students can track their stocks by placing a stock ticker active content item on the Active Desktop.
- Encourage students to use Internet sources in their research papers. Discuss authority, authenticity, applicability and bias when using information from the Internet. Teach students how to attribute Internet sources in their papers. You may also want to discuss other issues associated with Internet information such as intellectual property rights, free speech, and censorship.
- Search for online education journals of interest to you. Bookmark or subscribe to them.
- Search the active channels for sites that can give you teaching ideas and help students learn more about your subject. You can then add the channels to your Favorites list, or subscribe to the active channels. Outstanding sites include:
- Science
—Discovery Channel at www.discovery.com
- Geography
—National Geographic at www.nationalgeographic.com
- History
—GeoHistory at www.geohistory.com
- Current Events
—The New York Times at www.nytimes.com
- Technology News
—Wired at www.wired.com/news
- Use search engines to find information specific to a lesson you are teaching.
For example, if you are teaching a biology lesson on invertebrates, you can do a search on the term invertebrate to find fun and interesting sites, then direct your students to these sites when appropriate.
- At Back-to-School Night, or when you meet parents for the first time, ask for their e-mail addresses. You can then communicate with parents and send them:
- Calendars of classroom activities and assignment due dates.
- Student progress reports.
- Reminders about upcoming school activities, PTA meetings, and parent-teacher conferences.
- Use e-mail to communicate with other teachers about staff meetings and other school activities. E-mail can be read at the teachers' convenience and need not take away from teaching time.
- Have students correspond through e-mail with students in another geographic location. Also encourage them to send e-mail to others they may not know, such as scholars who have published information about the students’ research paper topics, local or national political representatives, or favorite childrens book authors. Discuss e-mail etiquette and appropriate tone for different types of correspondence.


