home   Java Script   MS Access   Perl   HTML   Delphi   C ++   Visual Basic   Java   CGIPerl   MS Excel   Front Page 98   Windows 98   Ms Word   Builder   PHP   Assembler     Link to us   Links    


Creating a Web Site with FrontPage 98

What you will learn from this lesson

When you create a Web site with FrontPage 98 you will:


What you should do before you start this lesson


Exploring the lesson

Creating a home page

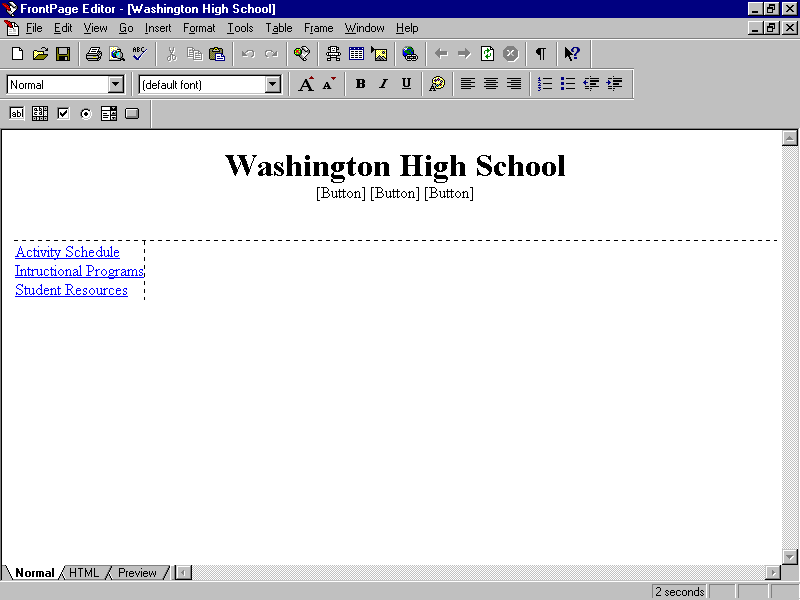
You organized your Web in the previous chapter. The next step is to work on the home page, which is the default page when viewed on the Web. The home page usually contains an introduction and links to other pages, and it may consist of a header, active page or body, and footer or a combination of navigation bars, text, title, and images.

Opening a Web home page

You can open the Web from the Folders view in the FrontPage Explorer, and then go to the FrontPage Editor.

Opening a Web page in the FrontPage Explorer

  1. On the File menu, click Open FrontPage Web.
  2. Click Open an Existing FrontPage Web.
  3. Click washingtonhigh, and click OK.
  4. On the Views toolbar, click Folders.
  5. In the Folders view, in the Name column, double-click default.htm.

The home page will open in the FrontPage Editor, and the screen will look like the next illustration.

Using the FrontPage Editor toolbar

The toolbar in the FrontPage Editor is different from the one in the FrontPage Explorer. Besides the Standard and Format toolbars, the FrontPage Editor offers different toolbars that can be activated from the View menu and the File menu.

Exploring the toolbar in the FrontPage Editor

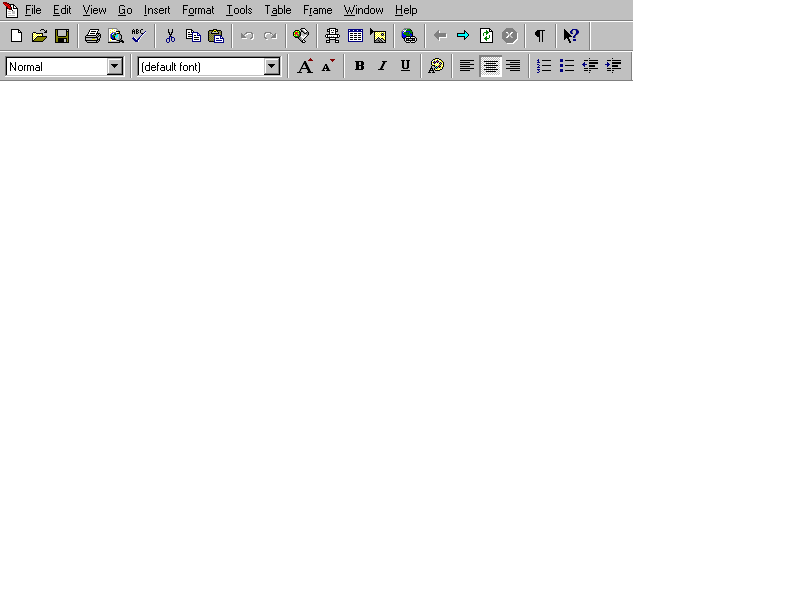
The Standard toolbar contains buttons for commonly used Edit and File menu commands; inserting FrontPage components, tables, and images; and other commands such as creating and editing hyperlinks.

The Format toolbar houses the FrontPage Editor commands that reformat selected paragraphs or text.

Exploring toolbar features

In the FrontPage Editor, the menus and toolbars look like the following example.
 

  1. Move the pointer over unfamiliar buttons to view the labels that appear on the Standard and Format toolbars.
  2. On the File menu, click Page Properties.
  3. On the Background tab, click Specify Background and Colors.
  4. In the Background drop-down box, click Silver.
  5. In the Text drop-down box, click Maroon, and then click OK.
  6. In the lower-left corner, click Preview.
  7. In the lower-left corner, click Normal.

Creating a new page in the FrontPage Editor

You can add a new page in the FrontPage Editor by choosing from several page templates and frames. For example, one template is a form in which users can search within the Web site for documents containing specific words or combinations of words.

Using the FrontPage Editor to create a new page

Beginning a new page using the FrontPage Editor
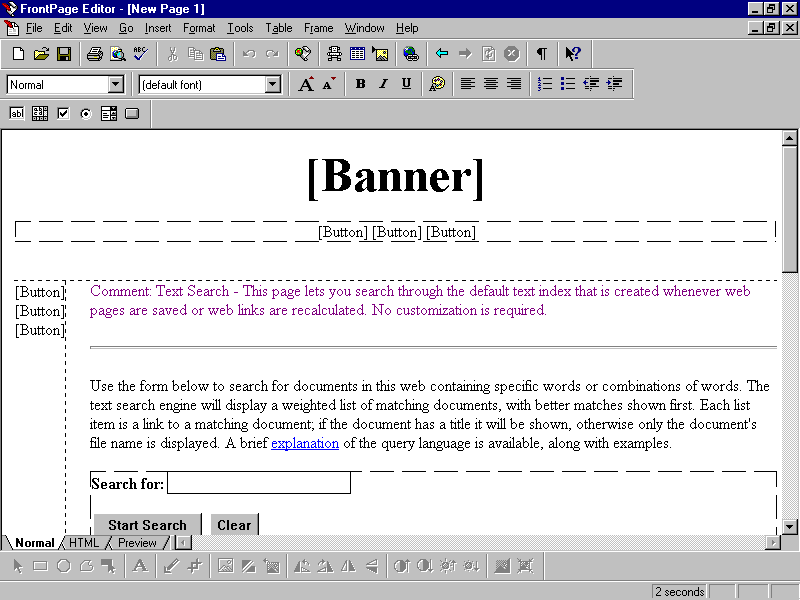
  1. On the Home Page, on the File menu, click New.
  2. On the Page tab, click Search Page, and then click OK.

Saving in the FrontPage Editor

Saving a page

  1. On the File menu, click Save.
  2. In the Save As dialog box, in the URL text box, type search.htm. In the Title text box, type Search, and then click OK.
  3. On the Standard toolbar, click the Show FrontPage Explorer button.

Linking pages in the FrontPage Explorer

It is easy to set up the organization and linking of pages.

Linking a page in the FrontPage Explorer.
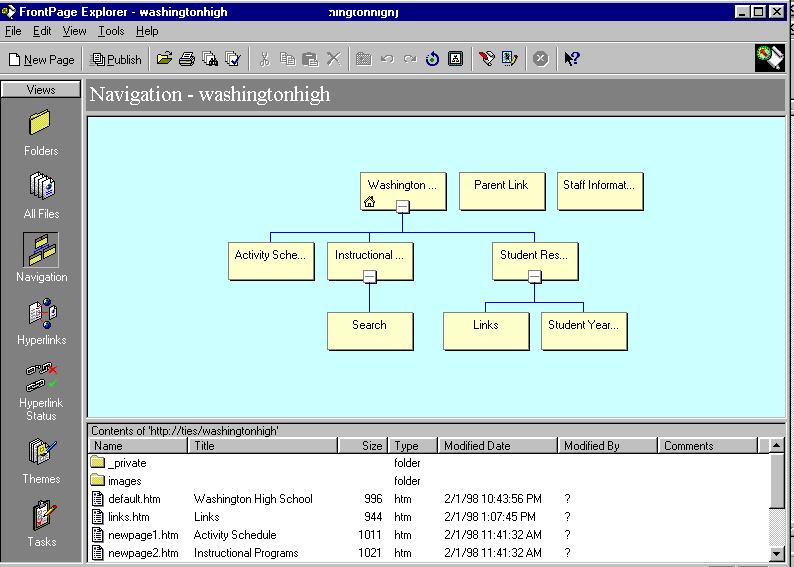
  1. On the Views toolbar, click Navigation.
  2. In the lower pane, in the Name column, click search.htm, and drag it to the Instructional Program box in the upper pane to set up a link between the two pages.
  3. Double-click the Washington High School Home Page box to get back to the FrontPage Editor.

Adding a theme to a page

A FrontPage theme consists of unified design elements and color schemes for bullets, fonts, images, navigation bars, and other page elements. A theme gives the pages and navigation bars in your FrontPage Web an attractive and consistent appearance.

You can easily add a theme in the FrontPage Editor.

Adding a theme in the FrontPage Editor
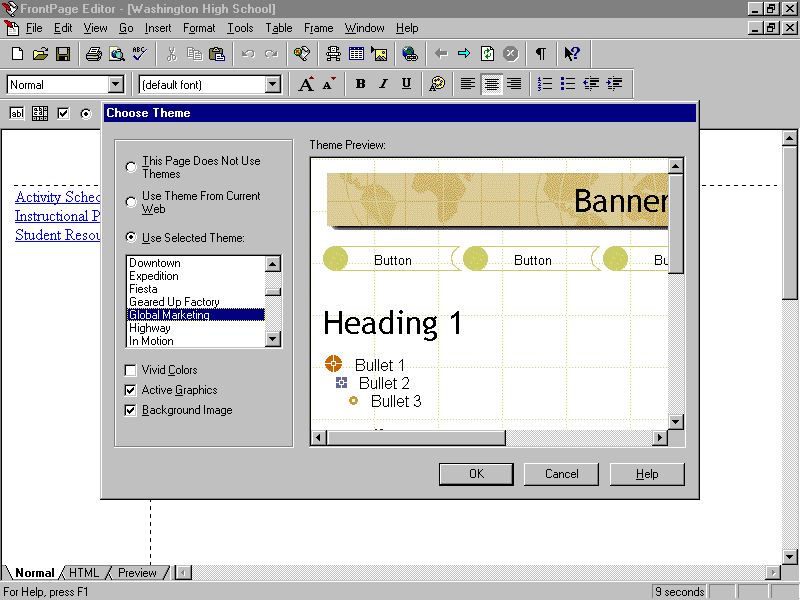
  1. Click Format, and then click Theme.
  2. In the Choose Theme dialog box, click Use Selected Theme, and then click Global Marketing.
  3. Select Active Graphics and Background Image. Make sure Vivid Colors is not selected.
  4. Click OK.

Organizing the page header

The header, located at the top of the page, describes the subject and contains the title. It may contain possible subtitles and a banner. The header is at the top of the page, and, with a theme added, also includes the banner and buttons. Clicking on the header makes the WebBot appear when the mouse is positioned over the header. When you double-click again, the Navigation Bar Properties dialog box opens.

Organizing the page header navigation buttons
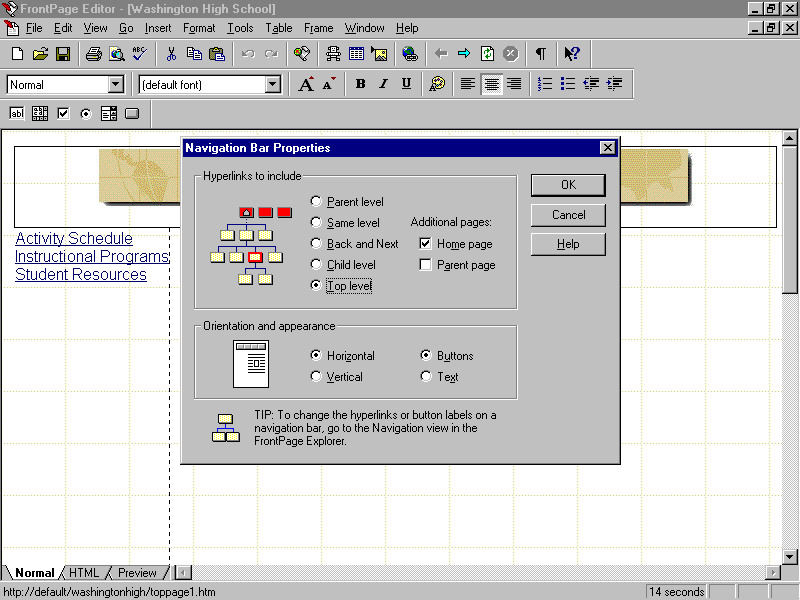
  1. Continuing to work on the home page, click the Washington High School Header.
  2. When the pointer turns into the WebBot, double-click in the Header box outside the text.
  3. In the Navigation Bar Properties dialog box, under Hyperlinks to include, click Top level. Under Additional pages, select Home page.
  4. Under Orientation and appearance, click Horizontal, and click Buttons.
  5. Click OK.

Adding the body or active page

The body or active page is located below the header and contains the content or information about the Web. It may include images, text, sound clips, motion clips, and links to other pages. The text usually states the purpose. There are many wizards and templates to help provide ideas.

Organizing navigation buttons

Organizing navigation buttons in the FrontPage Editor
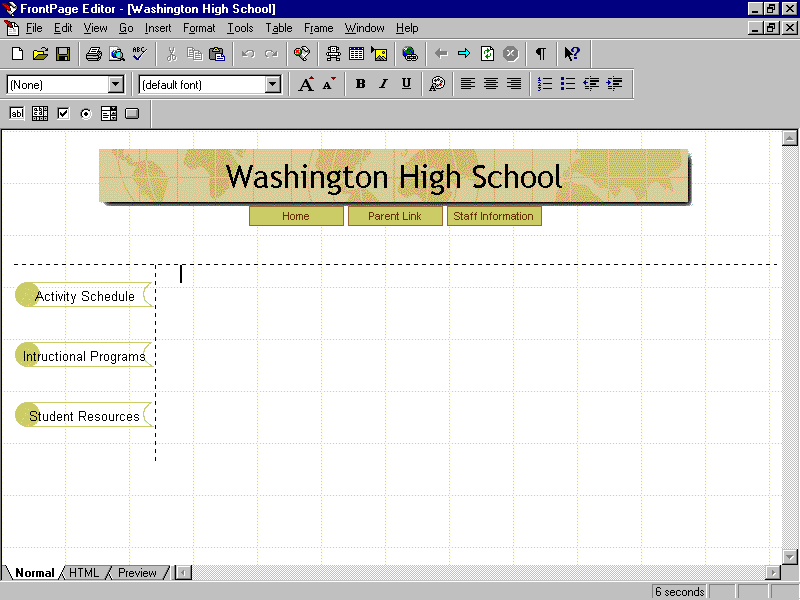
  1. Click the underlined words on the left side of the page.
  2. When the pointer becomes the WebBot, double-click.
  3. In the Navigation Bar Properties dialog box, under Hyperlinks to include, click Child level, and under Additional pages, select Parent page.
  4. Under Orientation and appearance, click Vertical and Buttons.
  5. Click OK.

Adding text

Using the FrontPage Editor, you can quickly and easily add text.

Adding text in the FrontPage Editor
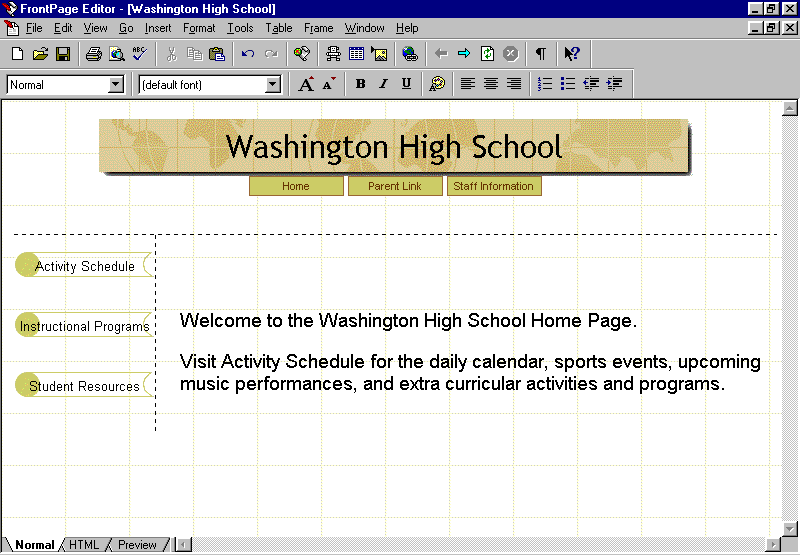
  1. Click in the body of the home page.
  2. Press enter twice.
  3. Type Welcome to the Washington High School Home Page.
  4. Press enter, and type Visit Activity Schedule for the daily calendar, sports events, upcoming music performances, and extracurricular activities and programs.
  5. Select both of the sentences you just typed.
  6. On the Formatting toolbar, click the Increase Text Size button.

Adding a graphic

Along with its comprehensive set of image commands, FrontPage includes a full library of clip art from the Microsoft Clip Gallery. You can use these buttons, icons, background patterns, video clips, and other images in your FrontPage Web pages.

Adding a graphic in the FrontPage Editor
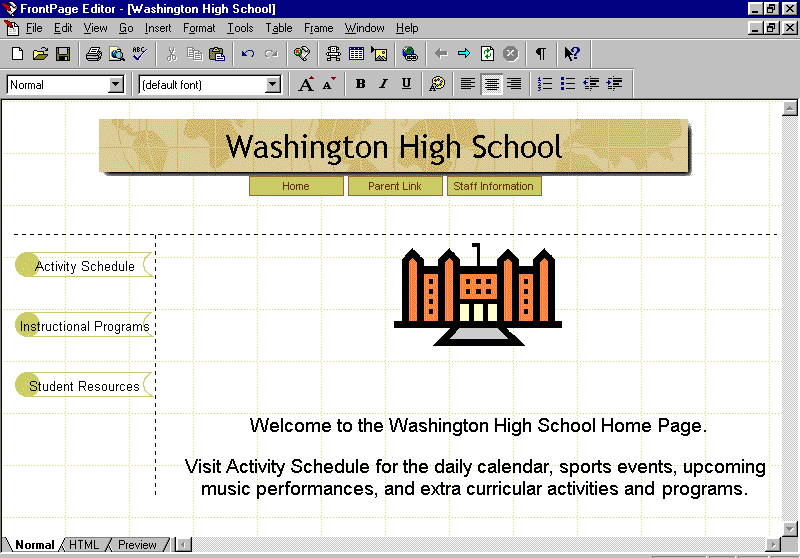
  1. Click below the header.
  2. On the Standard toolbar, click Center.
  3. Click Insert, and then click Clipart.
  4. In the Microsoft Clip Gallery 3.0 dialog box, on the Clip Art tab, click Buildings, and then click one of the images.
  5. Click Insert.
  6. When the image is on the page, click it to select it.
  7. Click the handle in the lower-right corner of the image, and drag it up and to the upper left to make the image smaller to fit the space.

Adding the footer to a page

The footer, located at the bottom of the page, can contain navigational links to other pages, a school district logo, or any contact information such as a phone number or an e-mail address.

Adding text

  1. Click at the end of the text, and press enter five times.
  2. Type Telephone, and press tab.
  3. Type 123-555-0111, and press enter.
  4. Type Fax, and press tab until the insertion point is aligned below the telephone number.
  5. Type 123-555-0128, and press enter.
  6. Type Address, and press tab to align the insertion point below the fax number.
  7. Type 1101 Main Street, Your City, State Zip, and press enter.
  8. Type E-mail, and press tab to align the insertion point below the address.
  9. Type pkirkland@washingtonhs.edu. and press enter.
  10. Select the text you just typed, and on the Format toolbar, click the Decrease Text Size button, and then click outside the text.

Saving your work in the FrontPage Editor

If the page is open from the current FrontPage Web, your computer, or the local network, the Save command saves the page without prompting. If you have inserted any images, sounds, videos, and so on, the Save command displays the Save Embedded Files dialog box. This dialog box gives you the option to save each new or replaced image, sound, video, and so on to the current FrontPage Web.

Saving a Web

Saving a Web

  1. On the File menu, click Save.
  2. In the Save Embedded Files dialog box, click OK.

Checking the spelling

The FrontPage Editor enables you to check the spelling of your Web.

Checking the spelling

  1. Still working on the home page in the FrontPage Editor, in the first paragraph add a third o to the word school. In the second paragraph, add a second r to the word sports.
  2. On the Standard toolbar, click the Check Spelling button.
  3. In the Spelling dialog box, click Change for the correct spelling of school and sports (if it was not changed with school).
  4. Click OK to close the FrontPage Editor box.

To timestamp a page

A timestamp is a FrontPage component that inserts the date and time a page was last edited or updated. It allows users to know how current the information is on the Web.

To timestamp a page

  1. Position the pointer at the bottom of the page, and click where you want to insert the timestamp in the footer.
  2. On the Insert menu, click Timestamp.
  3. In the Timestamp Properties dialog box, under Display, click which event the timestamp will record:
    Date this page was last edited.
    – or –
  4. Date this page was last automatically updated.
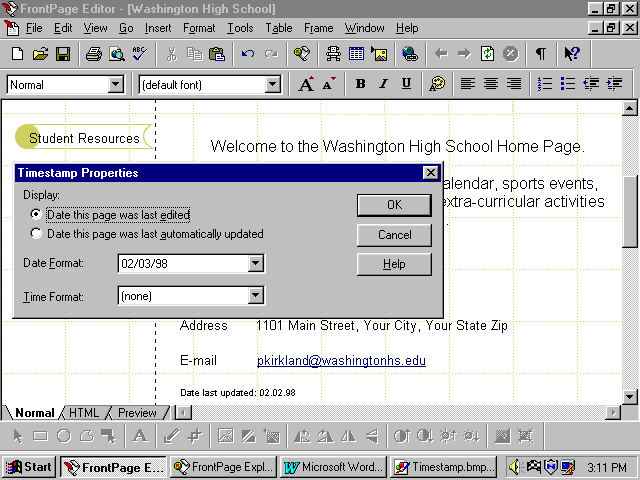
  5. Select a date format from the Date Format drop-down list.
  6. Select a time format from the Time Format drop-down list (optional). You may select a date format, a time format, or both.
  7. Click OK.


How you can use what you learned

The home page is the first page people see when they visit your Web. It should be attention getting and representative of your Web. You can use a theme, or just enter text and set up other page properties for your home page. You may want to add the same theme to all of your Web pages, or add a different theme to some pages.

You may want to add a theme to the other pages in the Web at this time. You can view different themes in the browser.

Some possible themes are:

Discussion page—Arcs

Staff Information—In Motion

Activity Schedule—Bubbles

Student Resources—Blocks

Links—Citrus Punch

Student Yearbook—Clear Day

Extensions

Adding a bulleted list

Bulleted lists, also called unordered lists, are lists formatted so that a bullet character usually indicates the individual elements. Applying a special style to the paragraph creates bullets. Many times you will want to add a list that is either numbered or bulleted. The procedure is similar for both.

Adding a bulleted list to your Web

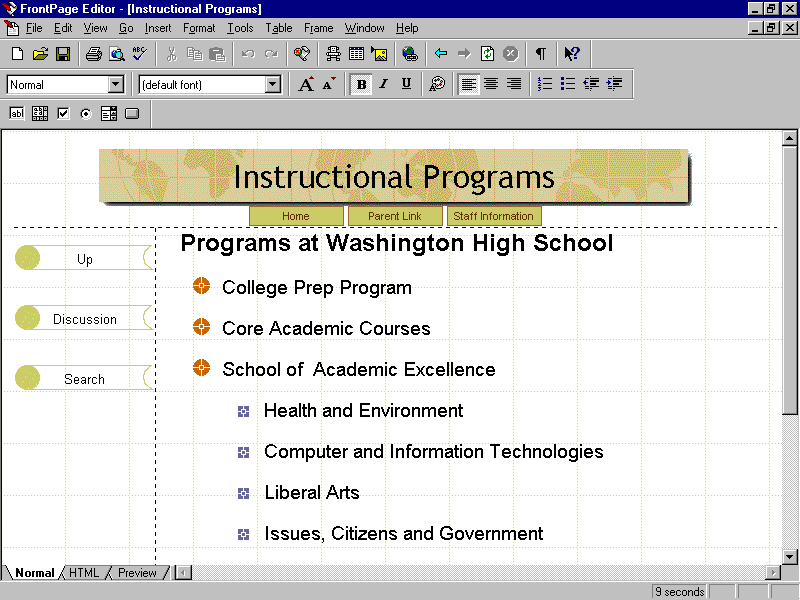
  1. Press ctrl+click on the Instructional Programs link.
  2. In the body, type a title: Programs at Washington High School. Press enter.
  3. On the next line, type College Prep Programs. Press enter.
  4. On the next line, type Core Academic Courses. Press enter.
  5. On the next line, type School of Academic Excellence. Press enter.
  6. On the next line, type Health and Environment. Press enter.
  7. On the next line, type Computer and Information Technologies. Press enter.
  8. On the next line, type Liberal Arts. Press enter.
  9. On the next line, type Issues, Citizens and Government. Press enter.
  10. On the next line, type International Studies.
  11. Select the first line, and on the Format toolbar, click the Increase Text Size button once.
  12. Select the items below the first line, and on the Format toolbar, click the Bulleted List button.
  13. Select the items below the line School of Academic Excellence.
  14. On the Format toolbar, click the Increase Indent button twice.
  15. On the Format menu, click Themes.
  16. In the Choose Theme dialog box, click Use Selected Themes.
  17. Click Global Marketing, and click OK.
  1. On the File menu, click Save.
  2. Quit the FrontPage Editor and FrontPage Explorer.


Summarizing what you learned

In this chapter you have explored and practiced: