| home Java Script MS Access Perl HTML Delphi C ++ Visual Basic Java CGIPerl MS Excel Front Page 98 Windows 98 Ms Word Builder PHP Assembler Link to us Links |

![]()
![]()
![]()
A major feature of the Delphi IDE is the integrated debugger. The debugger enables you to easily set breakpoints, watch variables, inspect objects, and do much more. Using the debugger, you can quickly find out what is happening (or not happening) with your program as it runs. A good debugger is vital to efficient program development.
Debugging is easy to overlook. Don't tell anyone, but when I first started Windows programming, I ignored the debugger for a long time because I had my hands full just learning how to do Windows programming. When I found out how valuable a good debugger is, I felt a little silly for cheating myself out of the use of that tool for so long. Oh well, live and learn. You have the luxury of learning from my mistakes. Today, you learn about what the debugger can do for you.
The IDE debugger provides several features and tools to help you in your debugging chores. The following are discussed today:
The quick answer is that the debugger helps you find bugs in your program. But the debugging process isn't just for finding and fixing bugs--it is a development tool as well. As important as debugging is, many programmers don't take the time to learn how to use all the features of the IDE debugger. As a result, they cost themselves time and money, not to mention the frustration caused by a bug that is difficult to find.
You begin a debugging session by starting up the program under the debugger. You automatically use the debugger when you click the Run button on the toolbar. You can also choose Run|Run from the main menu or press F9 on the keyboard.
Before getting into the details of the debugger, let's review the menu items that pertain to the debugger. Some of these menu items are on the main menu under Run, and others are on the Code Editor context menu. Table 10.1 lists the Code Editor context menu items specific to the debugger along with their descriptions.
| Item | Shortcut | Description |
| Toggle Breakpoint | F5 | Toggles a breakpoint on or off for the current line in the Code Editor. |
| Run to Cursor | F4 | Starts the program (if necessary) and runs it until the line in the editor window containing the cursor is reached. |
| Item | Shortcut | Description |
| Inspect | Alt+F5 | Opens the Debug Inspect window for the object under the cursor. |
| Goto Address | Ctrl+Alt+G | Enables you to specify an address in the program at which program execution will resume. |
| Evaluate/Modify | Ctrl+F7 | Enables you to view and/or modify a variable at runtime. |
| Add Watch at Cursor | Ctrl+F5 | Adds the variable under the cursor to the Watch List. |
| View CPU | Ctrl+Alt+C | Displays the CPU window. |
The Run item on the main menu has several selections that pertain to running programs under the debugger. The Run menu items enable you to start a program under the debugger, to terminate a program running under the debugger, and to specify command-line parameters for your program, to name just a few functions. Some items found here are duplicated on the Code Editor context menu. Table 10.2 shows the Run menu items that control debugging operations.
| Item | Shortcut | Description |
| Run | F9 | Compiles the program (if needed) and then runs the program under the control of the IDE debugger. Same as the Run toolbar button. |
| Parameters | None | Enables you to enter command-line parameters for your program and to assign a host application when debugging a DLL. |
| Step Over | F8 | Executes the source code line at the execution point and pauses at the next source code line. |
| Trace Into | F7 | Traces into the method at the execution point. |
| Trace to Next Source Line | Shift+F7 | Causes the execution point to move to the next line in the program's source code. |
| Run to Cursor | F4 | Runs the program and pauses when program execution reaches the current line in the source code. |
| Show Execution Point | None | Displays the program execution point in the Code Editor. Scrolls the source code window if necessary. Works only when program execution is paused. |
| Program Pause | None | Pauses program execution as soon as the execution point enters the program's source code. |
| Program Reset | Ctrl+F2 | Unconditionally terminates the program and returns to the Delphi IDE. |
| Inspect | None | Displays the Inspect dialog box so that you can enter the name of an object to inspect. |
| Evaluate/Modify | Ctrl+F7 | Displays the Evaluate/Modify dialog box. |
| Add Watch | Ctrl+F5 | Displays the Watch Properties dialog box. |
| Add Breakpoint | None | Displays a submenu that contains items to add a source, address, data, or module load breakpoint. |
You will use these menu items a lot when you are debugging your programs. You should also become familiar with the various keyboard shortcuts for the debugging operations. Now let's take a look at breakpoints and how to use them in your program.
When you run your program from the Delphi IDE, it runs at full speed, stopping only where you have set breakpoints.
New Term: A breakpoint is a marker that tells the debugger to pause program execution when it reaches that place in the program.
To set a breakpoint, click in the editor window's gutter to the left of the line on which you want to pause program execution (the gutter is the gray margin along the Code Editor window's left edge). The breakpoint icon (a red circle) appears in the gutter and the entire line is highlighted in red. To clear the breakpoint, click on the breakpoint icon and the breakpoint is removed. You can also press F5 or choose Toggle Breakpoint from the Code Editor context menu to toggle a breakpoint on or off.
NOTE: A breakpoint can be set only on a line that generates actual code. Breakpoints are not valid if set on blank lines, comment lines, or declaration lines. You are not prevented from setting a breakpoint on these types of lines, but the debugger warns you if you do. Attempting to set a breakpoint on any of the following lines will produce an invalid breakpoint warning:{ This is a comment followed by a blank line. } X : Integer; { a declaration }
Breakpoints can be set on a function or procedure's end statement.
If you set a breakpoint on an invalid line, the Code Editor will display the breakpoint in green (assuming the default color scheme) and the breakpoint icon in the gutter will be grayed.
When the program is run under the debugger, it behaves as it normally would--until a breakpoint is hit, that is. When a breakpoint is hit, the IDE is brought to the top and the breakpoint line is highlighted in the source code. If you are using the default colors, the line where the program has stopped is highlighted in red because red indicates a line containing a breakpoint.
New Term: The execution point indicates the line that will be executed next in your source code.
As you step through the program, the execution point is highlighted in blue and the editor window gutter displays a green arrow glyph. Understand that the line highlighted in blue has not yet been executed but will be when program execution resumes.
NOTE: The current execution point is highlighted in blue unless the line containing the execution point contains a breakpoint. In that case, the line is highlighted in red. The green arrow glyph in the gutter is the most accurate indication of the execution point because it is present regardless of the line's highlighting color.
When you stop at a breakpoint, you can view variables, view the call stack, browse symbols, or step through your code. After you have inspected any variables and objects, you can resume normal program execution by clicking the Run button. Your application will again run normally until the next breakpoint is encountered.
NOTE: It's common to detect coding errors in your program after you have stopped at a breakpoint. If you change your source code in the middle of a debugging session and then choose Run to resume program execution, the IDE will prompt you with a message box asking whether you want to rebuild the source code. If you choose Yes, the current process will be terminated, the source code will be recompiled, and the program will be restarted.
The problem with this approach is that your program doesn't get a chance to close normally, and any resources currently in use might not be freed properly. This scenario will almost certainly result in memory leaks. Although Windows 95 and Windows NT handle resource leaks better than 16-bit Windows, it is still advisable to terminate the program normally and then recompile it.
The Delphi IDE keeps track of the breakpoints you set. These breakpoints can be viewed through the Breakpoint List window. To view the breakpoint list, choose View|Debug Windows|Breakpoints from the main menu. The Breakpoint List window is displayed as shown in Figure 10.1.
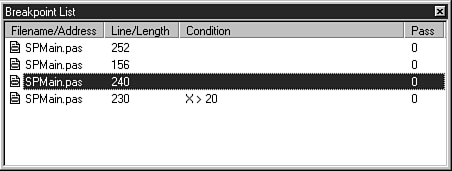 FIGURE 10.1.The
Breakpoint List window.
FIGURE 10.1.The
Breakpoint List window.
The Breakpoint List window has four columns:
The columns can be sized by dragging the dividing line between two columns in the column header.
NOTE: The Pass column doesn't show the number of times the breakpoint has been hit; it only shows the pass condition that you have set for the breakpoint.
The Breakpoint List window has two context menus. Table 10.3 lists the context menu items you will see when you click the right mouse button over any breakpoint. I will refer to this as the window's primary context menu.
| Item | Description |
| Enable | Enables or disables the breakpoint. When a breakpoint is disabled, its glyph is grayed out in the Breakpoint List window. In the source window, the breakpoint glyph is also grayed, and the breakpoint line is highlighted in green to indicate that the breakpoint is disabled. |
| Delete | Removes the breakpoint. |
| View Source | Scrolls the source file in the Code Editor to display the source line containing the breakpoint. (The Breakpoint List retains focus.) |
| Edit Source | Places the edit cursor on the line in the source file where the breakpoint is set and switches focus to the Code Editor. |
| Properties | Displays the Source Breakpoint Properties dialog box. |
| Dockable | Determines whether the Breakpoint List window is dockable. |
TIP: To quickly edit the source code line on which a breakpoint is set, double-click on the breakpoint in the Filename column of the Breakpoint List window. This is the same as choosing Edit Source from the Breakpoint List context menu.
The secondary context menu is displayed by clicking the right mouse button while the cursor is over any part of the Breakpoint List window that doesn't contain a breakpoint. This context menu has items called Add, Delete All, Disable All, Enable All, and Dockable. These items are self-explanatory, so I won't bother to comment on them.
NOTE: In my opinion, the Add context menu item isn't very useful. It is much easier to set a breakpoint in the Code Editor than to add a breakpoint via the Add command in the Breakpoint List window.
Breakpoints can be enabled or disabled any time you like. You disable a breakpoint if you want to run the program normally for a while; you can enable the breakpoint later without having to re-create it. The debugger ignores breakpoints that are disabled. To enable or disable a breakpoint, right-click on the breakpoint in the Breakpoint List window and toggle the Enable item on the context menu.
If you want to modify a breakpoint, choose Properties from the primary Breakpoint List context menu. When you do, the Source Breakpoint Properties dialog box is displayed (see Figure 10.2).
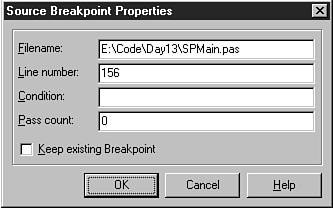 FIGURE 10.2.The
Source Breakpoint Properties dialog box.
FIGURE 10.2.The
Source Breakpoint Properties dialog box.
The primary reason for modifying a breakpoint is to add conditions to it. (Conditional breakpoints are discussed in the section "Conditional Breakpoints.")
To remove a breakpoint, select the breakpoint in the Breakpoint List window and then press the Delete key on the keyboard. To delete all breakpoints, right-click and then choose Delete All. Now let's take a look at the two breakpoint types: simple and conditional.
A simple breakpoint causes program execution to be suspended whenever the breakpoint is hit. When you initially set a breakpoint, it is by default a simple breakpoint. Simple breakpoints don't require much explanation. When the breakpoint is encountered, program execution pauses and the debugger awaits your bidding. Most of the time you will use simple breakpoints. Conditional breakpoints are reserved for special cases in which you need more control over the debugging process.
In the case of a conditional breakpoint, program execution is paused only when predefined conditions are met. To create a conditional breakpoint, first set the breakpoint in the Code Editor. Then choose View|Debug Windows|Breakpoints from the main menu to display the Breakpoint List window. Right-click on the breakpoint for which you want to set conditions and choose Properties. When the Source Breakpoint Properties dialog box is displayed, set the conditions for the breakpoint.
Conditional breakpoints come in two flavors. The first type is a conditional expression breakpoint. Enter the conditional expression in the Condition field of the Source Breakpoint Properties dialog box (refer to Figure 10.2). When the program runs, the conditional expression is evaluated each time the breakpoint is encountered. When the conditional expression evaluates to True, program execution is halted. If the condition doesn't evaluate to True, the breakpoint is ignored. For example, look back at the last breakpoint in the Breakpoint List window shown in Figure 10.1. This breakpoint has a conditional expression of X > 20. If at some point in the execution of the program X is greater than 20, the program will stop at the breakpoint. If X is never greater than 20, program execution will not stop at the breakpoint.
The other type of conditional breakpoint is the pass count breakpoint. With a pass count breakpoint, program execution is paused only after the breakpoint is encountered a specified number of times. To specify a pass count breakpoint, edit the breakpoint and specify a value for the Pass Count field in the Source Breakpoint Properties dialog box. If you set the pass count for a breakpoint to 3, program execution will stop at the breakpoint the third time the breakpoint is encountered.
NOTE: The pass count is 1-based, not 0-based. As indicated in the preceding example, a pass count of 3 means that the breakpoint will be valid the third time the breakpoint is encountered by the program.
Use pass count breakpoints when you need your program to execute through a breakpoint a certain number of times before you break to inspect variables, step through code, or perform other debugging tasks.
NOTE: Conditional breakpoints slow down the normal execution of the program because the conditions need to be evaluated each time a conditional breakpoint is encountered. If your program is acting sluggish during debugging, check your breakpoint list to see whether you have conditional breakpoints that you have forgotten about.
TIP: The fact that conditional breakpoints slow down program execution can work in your favor at times. If you have a process that you want to view in slow motion, set one or more conditional breakpoints in that section of code. Set the conditions so that they will never be met, and your program will slow down but not stop.
There is another debugging command that deserves mention here. The Run to Cursor command (found on the Run menu on the main menu and on the Code Editor context menu) runs the program until the source line containing the editing cursor is reached. At that point, the program stops as if a breakpoint were placed on that line.
Run to Cursor acts as a temporary breakpoint. You can use this command rather than set a breakpoint on a line that you want to immediately inspect. Just place the cursor on the line you want to break on and choose Run to Cursor (or press F4). The debugger behaves exactly as if you had placed a breakpoint on that line. The benefit is that you don't have to clear the breakpoint after you are done debugging that section of code.
So what do you do when you stop at a breakpoint? Usually you stop at a breakpoint to inspect the value of one or more variables. You might want to ensure that a particular variable has the value you think it should, or you might not have any idea what a variable's value is and simply want to find out.
The function of the Watch List is basic: It enables you to inspect the values of variables. Programmers often overlook this simple but essential feature because they don't take the time to learn how to fully use the debugger. You can add as many variables to the Watch List as you like. Figure 10.3 shows the Watch List during a debugging session.
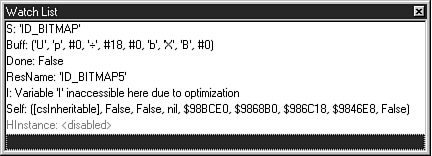 FIGURE 10.3.The
Watch List in action.
FIGURE 10.3.The
Watch List in action.
The variable name is displayed in the Watch List followed by its value. How the variable value is displayed is determined by the variable's data type and the current display settings for that watch item. I'll discuss the Watch List window in detail in just a bit, but first I want to tell you about a feature that makes inspecting variables easy.
The debugger and Code Editor have a nice feature that makes checking the value of a variable easy. This feature, the Tooltip expression evaluator, is on by default, so you don't have to do anything special to use it. If you want, you can turn off the Tooltip evaluator via the Code Insight page of the Environment Options dialog box (the Code Insight page was discussed yesterday).
So what is Tooltip expression evaluation (besides hard to say)? It works like this: After you stop at a breakpoint, you place the editing cursor over a variable and a tooltip window pops up showing the variable's current value. This makes it easy to quickly inspect variables. Just place your cursor over a variable and wait a half second or so.
The Tooltip evaluator has different displays for different variable types. For regular data members (Integer, Char, Byte, string, and so on), the actual value of the variable is displayed. For dynamically created objects (an instance of a class, for example), the Tooltip evaluator shows the memory location of the object. For records, the Tooltip evaluator shows all the record elements. Figure 10.4 shows the Tooltip expression evaluator inspecting a record's contents.
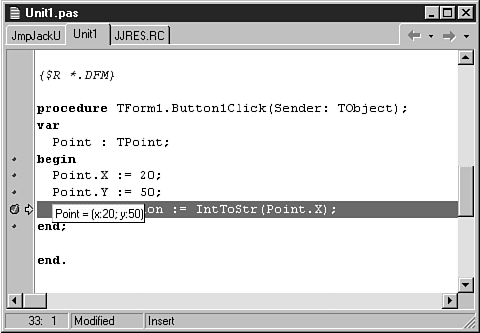 FIGURE 10.4.Tooltips
are a great debugger feature.
FIGURE 10.4.Tooltips
are a great debugger feature.
NOTE: Sometimes the Tooltip evaluator acts as if it's not working properly. If, for example, you place the editing cursor over a variable that is out of scope, no tooltip appears. The Tooltip evaluator has nothing to show for that particular variable, so it doesn't display anything.
Be aware, also, that variables optimized by the compiler might not show correct values. Optimization was discussed yesterday and is also discussed later in this chapter.
Another case where the Tooltip evaluator doesn't work is within a with block. Take this code, for example:
with Point do begin
  X := 20;
  Y := 50;
  Label1.Caption := IntToStr(X);
end;
If you were to place the mouse cursor over the variable X, the Tooltip evaluator would not report the value of X because X belongs to the target of the with statement (the Point variable). Instead, place the mouse cursor over the Point variable, and the debugger shows you the value of Point (including the X field).
The Tooltip expression evaluator is a great feature, so don't forget to use it.
As with every other Delphi window discussed so far, the Watch List has its own context menu. (You'd be disappointed if it didn't, right?) Table 10.4 lists the Watch List context menu items and their descriptions.
| Item | Description |
| Edit Watch | Enables you to edit the watch item with the Watch Properties dialog box. |
| Add Watch | Adds a new item to the Watch List. |
| Enable Watch | Enables the watch item. |
| Disable Watch | Disables the watch item. |
| Delete Watch | Removes the watch item from the Watch List. |
| Enable All Watches | Enables all items in the Watch List. |
| Disable All Watches | Disables all items in the Watch List. |
| Delete All Watches | Deletes all items in the Watch List. |
| Stay on Top | Forces the Watch List to the top of all other windows in the IDE. |
| Break When Changed | When the variable in the watch window changes, the debugger will break. The watch variable is displayed in red to indicate that Break When Changed is in effect. |
| Dockable | Determines whether the Watch List window is dockable. |
Both the Edit Watch and Add Watch context menu items invoke the Watch Properties dialog box, so let's look at that next.
You use the Watch Properties dialog box when you add or edit a watch. Figure 10.5 shows the Watch Properties dialog box as it looks when editing a variable called Buff.