| home Java Script MS Access Perl HTML Delphi C ++ Visual Basic Java CGIPerl MS Excel Front Page 98 Windows 98 Ms Word Builder PHP Assembler Link to us Links |
![]()
![]()
![]()
![]()
![]()
There are several ways to add a new table to an Access 95 database. These include using a wizard to assist you with the design process, designing the table from scratch, building the table from a spreadsheet-like format, importing the table from another source, and attaching to an external table. The first three methods are discussed here. The other two, importing and attaching, are covered extensively throughout this book.
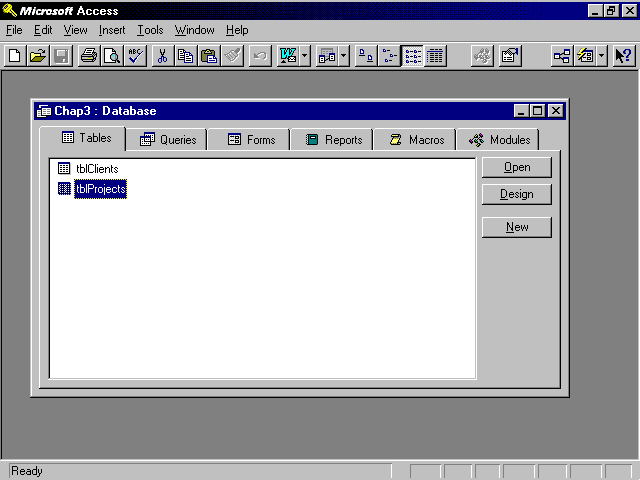
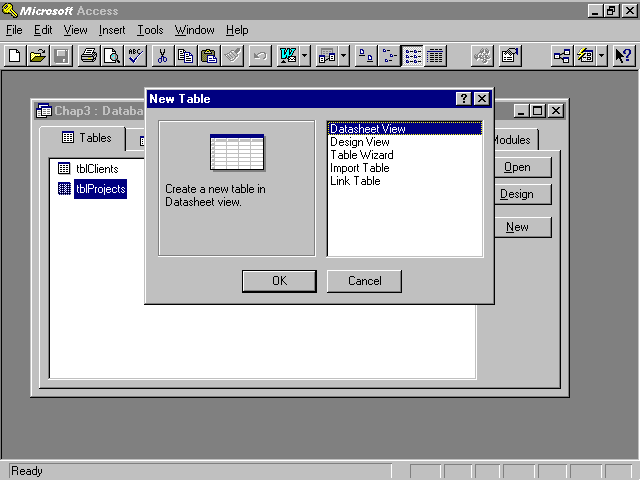
Regardless of which method you choose, start by selecting the Table tab of the database window and then click on the New button (see Figure 3.1). The New Table dialog appears (see Figure 3.2). This dialog allows you to select the method you want to use to build your table.
Figure 3.1. Create a new table by selecting the Tables tab of the Database window.
Figure 3.2. The New Table dialog allows you to select the method by which to create the new table.
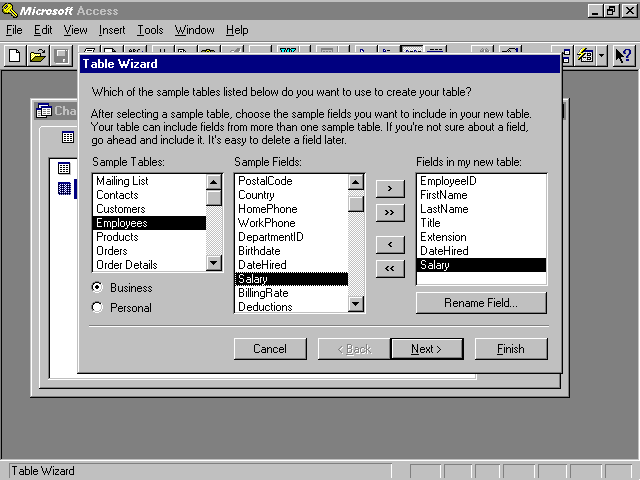
If you select Table Wizard from the New Table dialog, the Table Wizard dialog appears. The first step in the Table Wizard dialog allows you to select specific fields from one of many predefined tables. The tables are categorized as either Business or Personal. If you select Business, a set of business-related tables appears. If you select Personal, you see a set of tables relating to Personal topics. After you have selected a table, you can specify which fields you want to include in your table. To do this, double-click on the desired field or click on the > button. In Figure 3.3, I have selected the EmployeeID, FirstName, LastName, Title, Extension, DateHired, and Salary fields from the table called Employees.
Figure 3.3. Step 1 of the Table Wizard allows you to select a sample table and designate fields in the sample table that you want to be included in your table.
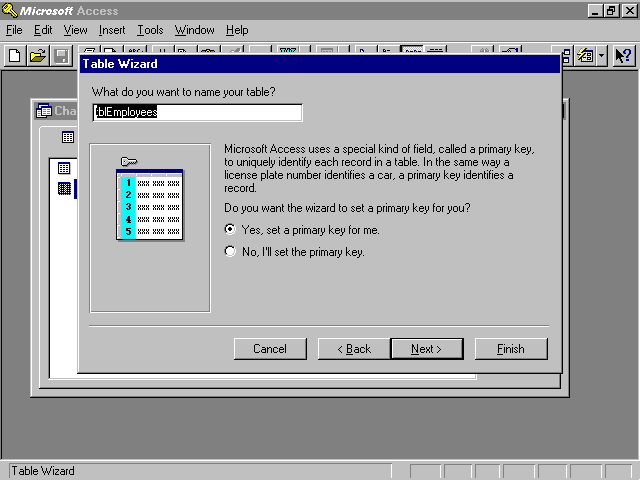
After you have selected the desired table and fields, click Next. The dialog shown in Figure 3.4 appears. This step of the Table Wizard allows you to name your table and indicate whether you want Access to set the primary key for you. Primary keys are covered in more detail later in this chapter. It is always a good idea for every table to contain a primary key. The primary key is used to uniquely identify each record. If you do not tell Access to set a primary key, you are given the opportunity to designate your unique field as the primary key at a later time. If you have not entered a unique identifier (some field that uniquely differentiates each record from the next) for the table, select Yes. Access adds an AutoNumber field to your table and designates it as the primary key. It is a good idea to let Access set the primary key but if you don't, the primary key or any other attributes of the table can be modified at any time.
Figure 3.4. Step 2 of the Table Wizard allows you to name your new table.
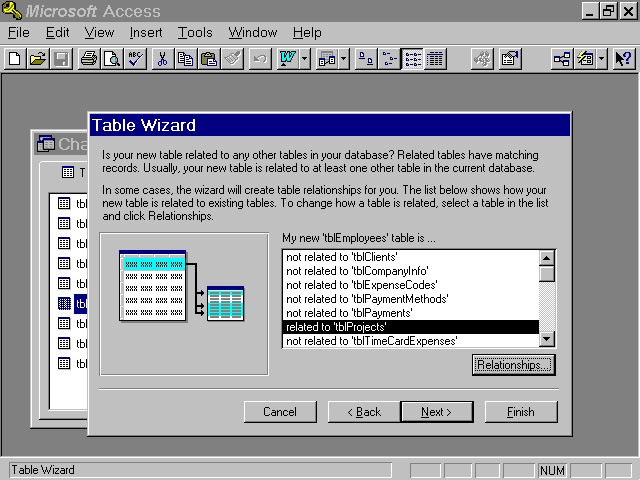
In the third step of the Table Wizard, Access attempts to identify any relationships between the new table and any existing tables. This step is shown in Figure 3.5. The process of establishing relationships is an important part of Access development. Relationships enable you to normalize your database and to once again "flatten out" the data structure at runtime. They also help you to ensure the integrity of data within your application. For example, you can define a relationship so that orders cannot be entered for customers that do not exist. Although Access automatically identifies relationships if it can, you can modify or add relationships by clicking on the Relationships button. When you are satisfied with the relationships, click Next.
Figure 3.5. Step 3 of the Table Wizard allows you to designate any relationships between the new table and existing tables.
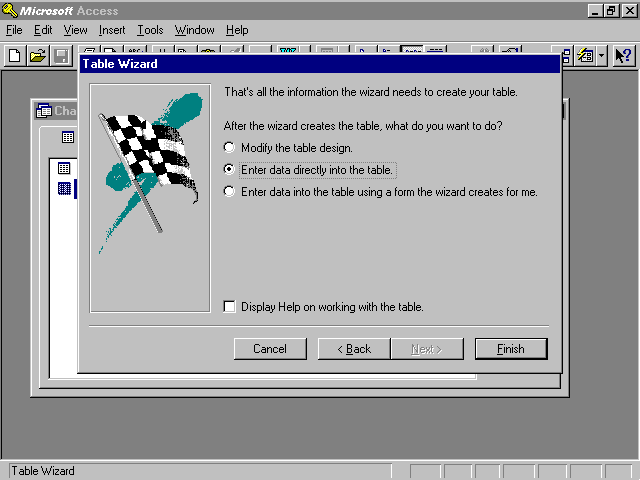
The final dialog, shown in Figure 3.6, allows you to indicate whether you want to view the design of the table, enter data into the table, or let Access automatically build both the table and a data-entry form for you.
Figure 3.6. Step 4 of the Table Wizard allows you to specify what you want the wizard to do when it has completed processing.
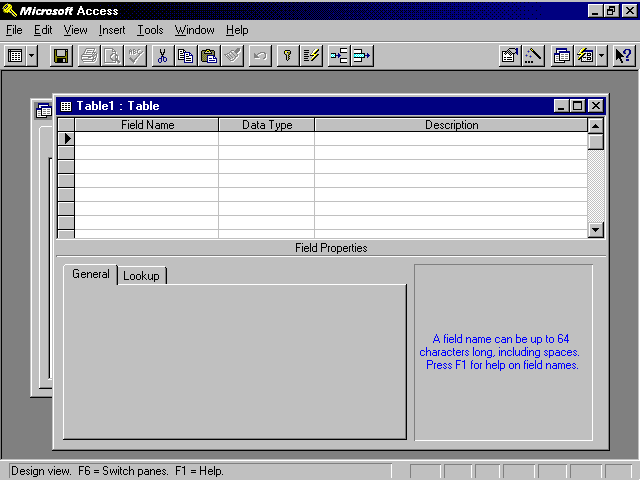
Designing tables from scratch is a method of creating a table that offers flexibility while encouraging good design principles. Select Design view from the New Table dialog. The Table Design view window appears (see Figure 3.7). Follow these steps:
Figure 3.7. The Table Design view window is used to enter field names, data types, and descriptions for all of the fields in a table.
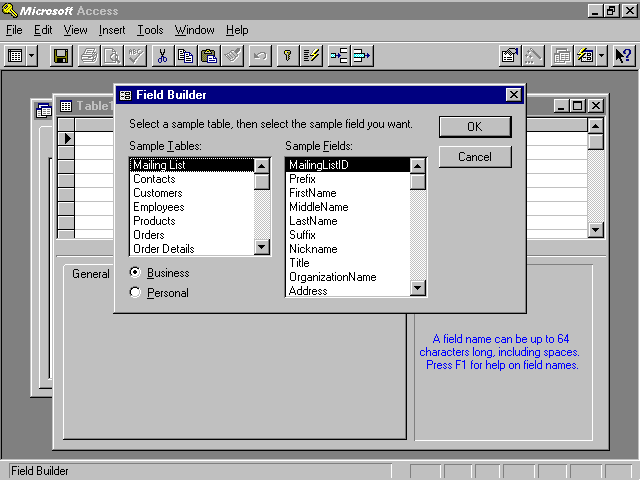
Figure 3.8. The Field Builder dialog enables you to select from predefined fields with predefined properties.
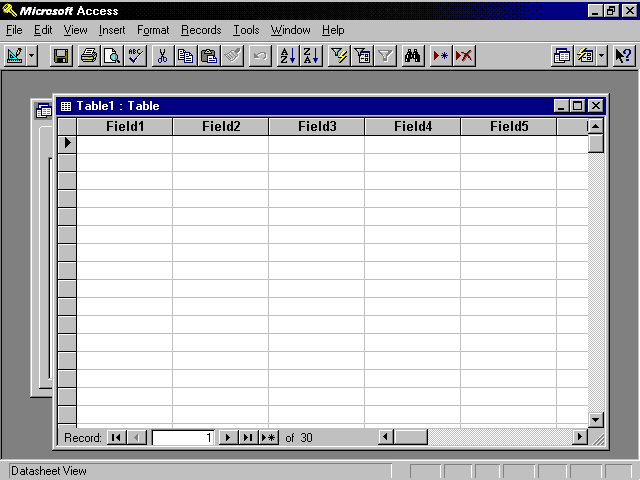
Building a table from a datasheet might seem easy, but it is not a very good way to build a table. This method of table design makes it easy to introduce severe design flaws into your table. Although this method was added as an "enhancement" to Access 95, it was added primarily for spreadsheet users getting their feet wet in the database world. I suggest you use one of the other methods to design your tables. If you decide to use the datasheet method, follow these steps:
Figure 3.9. Building a table from a datasheet.
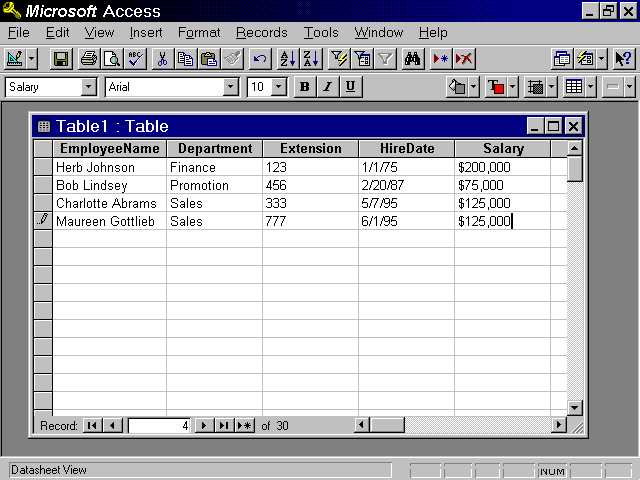
Figure 3.10. Data entered in a datasheet is used to determine the structure of the new table.
Figure 3.11. This table design results from the process of building a table from datasheet view.
The data type you select for each field can greatly affect the performance and functionality of your application. Several factors should influence your choice of data type for each field in your table:
The type of data you need to store in a field has the biggest influence on the data type you select. For example, if you need to store numbers that begin with leading zeros, you cannot select a Number field because leading zeros entered into a Number field are ignored. This factor is a consideration for data such as ZIP codes (some begin with leading zeros) and department codes.
If the contents of a field need to be included in calculations, you must select a Number or Currency data type. You cannot perform calculations on the contents of fields defined with the other data types. The only exception to this rule are date fields, which can be included in date/time calculations.
It is important to consider whether you need to sort or index the data within a field. Memo and OLE fields cannot be sorted; do not select these field types if the data within the field must be sorted or indexed. Furthermore, you must consider the way you want the data to be sorted. For example, within a Text field a set of numbers would be sorted in the order in which they appear (i.e., 1, 10, 100, 2, 20, 200) because the data within the Text field is sorted in a standard ASCII sequence. On the other hand, within a Number or Currency field the numbers would be sorted as expected (i.e., 1, 2, 10, 20, 100, 200). You might think that you would never want the data sorted in a standard ASCII sequence, but it might make sense to sort certain data, such as department codes, in this fashion.
Finally, you should consider how important disk space is to you. Each field type takes up a different amount of storage space on your hard disk, which might be a factor when you are selecting a data type for a field.
Eight field types are available in Access: Text, Memo, Number, Date/Time, Currency, AutoNumber (known as Counter in Access 2.0), Yes/No, and OLE Object. Information on the proper uses for each field type and the amount of storage space occupied by each type is summarized Table 3.1.
Field Type |
Appropriate Uses |
Storage Space |
|
Text |
Data containing text, a combination of text and numbers, or numbers that do not need to be included in calculations; examples are names, addresses, department codes, phone numbers |
Based on what is actually stored in the field; ranges from 0 to 255 bytes |
|
Memo |
Long text and numeric strings; examples are notes and descriptions |
Ranges from 0 to 64,000 bytes |
|
Number |
Data that will be included in calculations (excluding money); examples are ages, codes such as employee ID or payment method |
1, 2, 4, or 8 bytes, depending on the field size selected |
|
Date/Time |
Dates and times; examples are date ordered, birth date |
8 bytes |
|
Currency |
Currency values; examples are amount due, price |
8 bytes |
|
AutoNumber |
Unique sequential or random numbers; examples are invoice numbers, project numbers |
4 bytes (16 bytes for replication ID) |
|
Yes/No |
Fields that will contain one of two values (yes/no, true/false); examples are paid, tenured |
1 bit |
|
OLE Object |
Objects such as Word documents or Excel spreadsheets; examples are employee reviews, budgets |
0 bytes to 1 gigabyte depending on what is stored within the field |
The most difficult part of selecting a field type is knowing which type is best in each situation. The following detailed descriptions of each field type and when each is used should help you with this process.
Most of your fields will be Text fields. Many developers do not realize that it is best to use Text fields for any numbers not used in calculations. Examples are phone numbers, part numbers, and ZIP codes. Although the default size for a Text field is 50 characters, up to 255 characters can be stored in a Text field. Because Access allocates disk space dynamically, a large field size does not use hard-disk space, but you can improve performance if you allocate the smallest field size possible. The maximum number of characters allowed in a Text field can be controlled by the FieldSize property.
Memo fields can hold up to 64K of text. This amount of storage can hold up to 16 pages of text for each record. Memo fields are excellent for any types of notes you want to store with table data. Remember that you cannot sort by a Memo field.
Number fields are used to store data that must be included in calculations. If currency amounts are included in calculations or if your calculations require the highest degree of accuracy, you should use a Currency field rather than a Number field. The Number field is actually several types of fields in one because Access 95 offers six sizes of numeric fields. Byte can store integers from 1 to 255, and Integer can hold whole numbers from negative 32768 to 32767. Long Integer can hold whole numbers ranging from less than negative 2 billion to more than 2 billion. Although all three of these sizes offer excellent performance, each type requires an increasingly larger amount of storage space. Two of the other numeric field sizes, Single and Double, offer floating decimal points and therefore much slower performance. Single can hold fractional numbers to seven significant digits; Double extends the precision to 14 significant digits. The final size, Replication ID, is available only in Access 95. It provides a unique identifier required by the data synchronization process.
The Date/Time field type is used to store valid dates and times. Data/Time fields allow you to perform date calculations and ensure that dates and times are always sorted properly. Access actually stores the date or time internally as an 8-byte floating point number. Time is represented as a fraction of a day.
The Currency field type is a special type of number field appropriate when currency values are being stored in a table. Currency fields prevent the rounding off of data during calculations. They hold 15 digits of whole dollars plus accuracy to the hundredths of a cent. Although extremely accurate, this type of field is very slow.
The AutoNumber field in Access 95 is equivalent to the Counter field in Access 2.0. AutoNumber field values are automatically generated when a record is added. In Access 2.0, counter values had to be sequential. The AutoNumber field type in Access 95 can be either sequential or random. The random assignment is excellent when multiple users are adding records offline because it is unlikely that Access will assign the same random value to two records. A special type of AutoNumber field is a Replication ID. This randomly produced unique number helps with the replication process by generating unique identifiers used in the process of synchronizing database replicas.
You should note a few important things about sequential AutoNumber fields. If a user deletes a record from a table, its unique number is forever lost. Likewise, if a user is in the process of adding a record but cancels, the unique counter value for that record is forever lost. If this behavior is unacceptable, you can generate your own counter values. This process is covered in Chapter 18, "Developing for a Multiuser Environment."
You should use Yes/No fields to store a logical true or false. What is actually stored in the field is -1 for Yes and 0 for No. The display format for the field determines what the user actually sees (Yes/No, True/False, On/Off). Yes/No fields work efficiently for any data that can have only a true or false value. Not only do they limit the user to valid choices, they take up only 1 bit of storage space.
OLE Object fields are designed to hold data from any OLE server application registered in Windows, including spreadsheets, word-processing documents, sound, and video. Many business uses exist for OLE fields, such as storage of resumes, employee reviews, budgets, or videos.
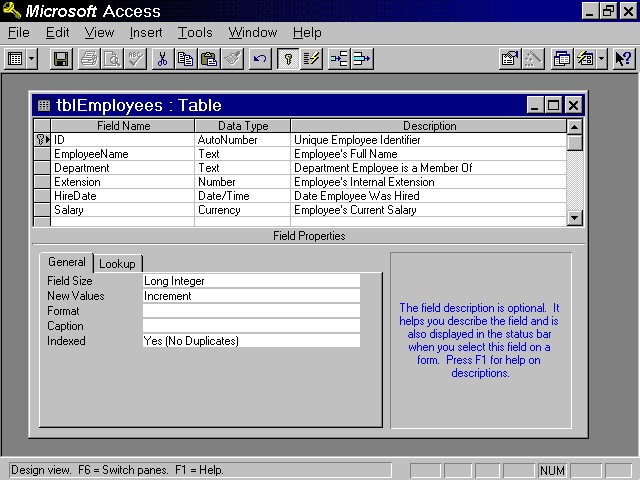
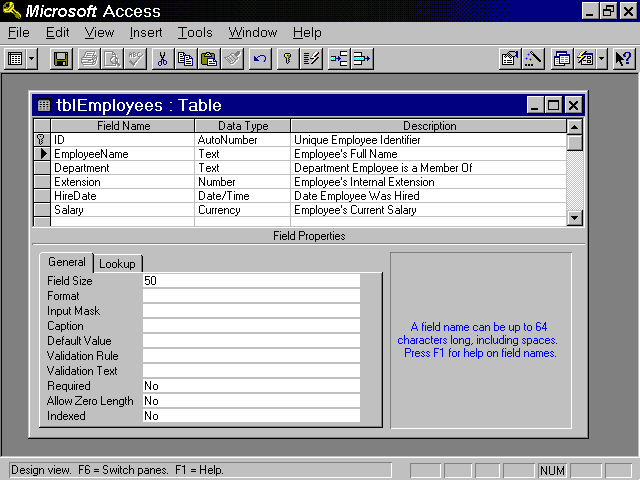
After you have added fields to your table, you need to customize their properties. Field properties allow you control how data is stored as well as what data can be entered into the field. The properties available differ depending on which field type is selected. You can find the most comprehensive list of properties under the Text field type (see Figure 3.12). The following section describes each field property.
Figure 3.12. The field properties available for a Text field.
The first property is Size. It is available for Text and Number fields only. As previously mentioned, it is best to set the field size to the smallest type possible. For Text fields, a small size improves performance. For Number fields, a small size means lower storage requirements and faster performance.
[ic:example]Build a table with the following fields and types:
To set the Size property of the State field to two characters, click anywhere within the field and then type 2 in the Size property. Switch to Datasheet view and name the table tblCustomers. Try to enter data into the State field. Notice that only two characters can be entered.
The second property is Format. This property is available for all but OLE Object fields. It allows you to specify how Access displays your data. Access allows you to select from predefined formats or to create your own custom formats. The formats available differ depending on the data type of the field. For example, Access allows you to select from a variety of Date/Time formats, including Short Date (7/7/96), Long Date (Sunday, July 7, 1996), Short Time (7:17), and Long Time (7:17:11AM). The formats for a Currency field include Currency ($1,767.25), Fixed (1767.25), and Standard (1,767.25).
[ic:example]Set the Format property of the ContactDate field to Medium Date. Switch to Datasheet view and enter some dates in the format mm/dd/yy. Notice that they appear in the format 07-Jul-96.
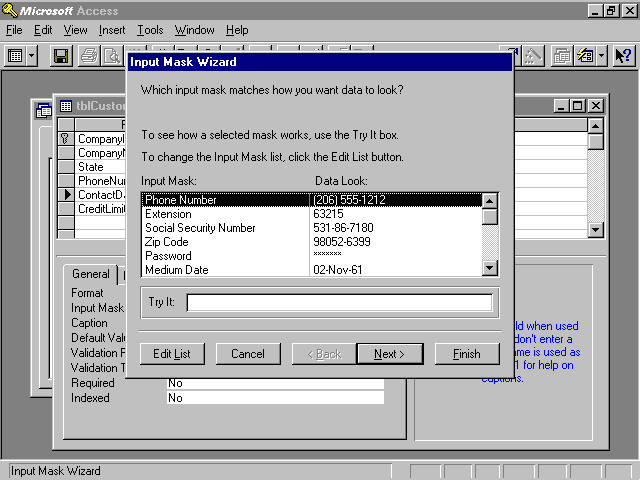
Another important property is Input Mask. It is available for Text, Number, Date/Time, and Currency fields. Whereas the Format property affects the display of data, the Input Mask property controls what data is stored in a field. You can use the Input Mask property to control, on a character by character basis, what type of character (numeric, alphanumeric, and so on) can be stored as well as whether a particular character is required. The Input Mask Wizard, shown in Figure 3.13, helps you create commonly used input masks. Here is an example of a resulting mask: 000-00-0000;;_.
Figure 3.13. The Input Mask Wizard assists with the process of entering an input mask.
This input mask forces the entry of a valid social security number. Everything that precedes the first semicolon designates the actual mask. The character between the first and second semicolon determines whether literal characters (the dashes in this case) are stored in the field. The zeros force the entry of the digits 0 through 9. The dashes are literals that appear within the control as the user enters data. If you enter a 0 in this position, literal characters are stored in the field. If you enter a 1 or leave this position blank, the literal character is not stored. The final position (after the second semicolon) indicates what character is displayed to indicate the space where the user types the next character (in this case the underscore).
Here is a more-detailed example. In the mask \(999") "000\-0000;;_ the first backslash causes the character that follows it (the parenthesis) to be displayed as a literal. The three nines allow for optional numbers or spaces to be entered. The parenthesis and space within the quotation marks are displayed as literals. The first three zeros require values 0 through 9. The dash that follows the next backslash is displayed as a literal. Four additional numbers are then required. The two semicolons have nothing in between them, so the literal characters are not stored in the field. The second semicolon is followed by an underscore, so an underscore is displayed to indicate the space where the user types the next character.
[ic:example]Use the Input Mask Wizard to add a mask for the PhoneNumber field. To do this, click anywhere in the PhoneNumber field and then click in the Input Mask property. Click on the ellipse to the right of the Input Mask property. Select Phone Number from the list of available masks. Opt not to store the literal characters within the field. Switch to Datasheet view and enter a phone number. Notice how your cursor skips over the literal characters. Try leaving the area code blank. Access should allow you to do this. Now try to enter a letter in any position. Access should prohibit you from doing this. Attempt to leave any character from the seven-digit phone number blank. Access should prohibit you from doing this.
The next property available is the Caption property. The text placed in this property becomes the caption for fields in Datasheet view. It is also used as the caption for the attached label added to data-bound controls when you add them to forms and reports. The Caption property becomes important whenever you name your fields without spaces. Whatever is in the Caption property overrides the field name for use in Datasheet view, on forms, and on reports.
Another important property is the Default Value property. You use this property to specify the default value that Access places in the field when the user adds new records to the table. Default values, which can be either text or expressions, can save the data-entry person a lot of time. They do not in any way validate what is entered into a field.
[ic:example]Enter the following default values for the State, ContactDate, and CreditLimit fields:
Switch to Datasheet view and add a new record. Notice that default values appear for the State, ContactDate, and CreditLimit fields. You can override these defaults if you wish.
Whereas the Default Value property suggests a value to the user, the Validation Rule property limits what the user can place in the field. The validation rule cannot be violated; the database engine strictly enforces validation rules. As with the Default Value property, this property can contain either text or a valid Access expression. User-defined functions cannot be included in the Validation Rule property. References to forms, queries, or tables cannot be included in the Validation Rule property.
Add the following validation rules to the fields within your table:
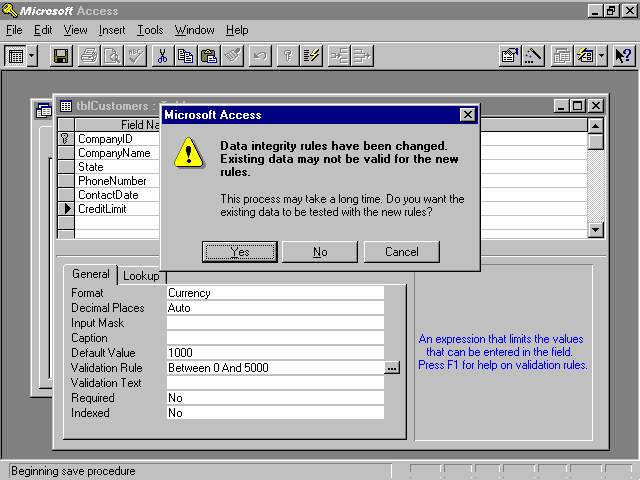
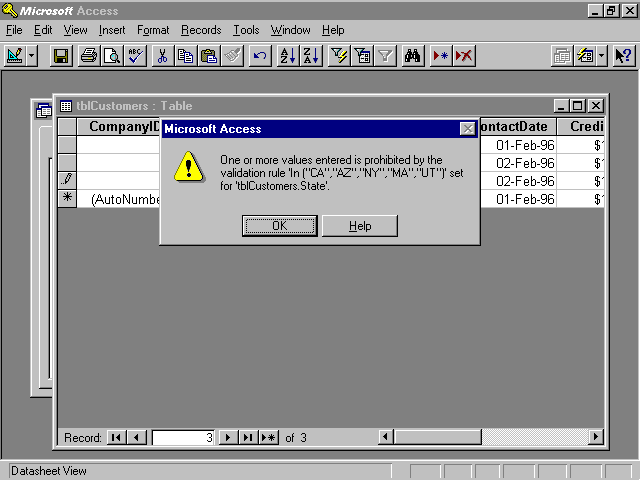
Switch to Datasheet view. After you save the table, the message shown in Figure 3.14 appears. If you select Yes, Access attempts to validate all existing data using the new rules. If any errors are found, you are notified that errors occurred, but you are not informed of the offending records (see Figure 3.15). You need to build a query to locate all records violating the new rules. If you select No, Access does not attempt to validate your existing data. You are not warned of any problems. After you have entered Datasheet view, try to enter an invalid state into the State field. The message box displayed in Figure 3.16 appears. As you can see, this is not the most friendly message, which is why you should create a custom message using the Validation Text property.
Figure 3.14. This message box asks whether you want to validate existing data.
Figure 3.15. A warning that all data did not validate successfully.
Figure 3.16. This message appears when a validation rule is violated and no validation text has been entered.
Use the Validation Text property to specify the error message that users sees when they violate the validation rule. The Validation Text property must contain text; expressions are not valid in this property.
[ic:example]Add the following to the Validation Text properties of the State, ContactDate, and CreditLimit fields:
Try entering invalid values for each of the three fields. Observe the error messages.
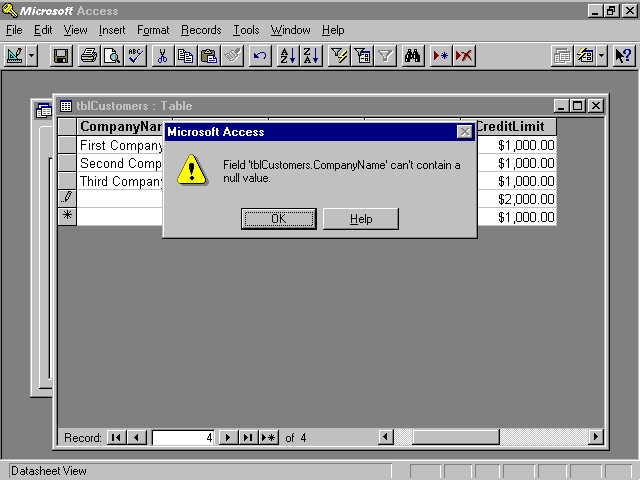
The Required property is very important. It determines whether you require that a value be entered into the field. This property is useful for foreign key fields, where you want to ensure that data is entered into the field. It is also useful for any field that contains information that is required for business reasons (company name, for example).
[ic:example]Set the Required property of the CompanyName and PhoneNumber fields to Yes. Switch to Datasheet view and attempt to add a new record, leaving the CompanyName and PhoneNumber fields blank. Make sure that you enter a value for at least one of the other fields in the record. When you try to move off the record, the error message shown in Figure 3.17 appears.
Figure 3.17. This message appears when a field is left blank with the Required property set to Yes.
The Allow Zero Length property is similar to the Required property. Use it to determine whether you will allow the user to enter a zero-length string (""). A zero-length string is not the same as a null (absence of an entry). A zero-length string indicates that the data does not exist for that particular field. For example, a foreign employee might not have a social security number. By entering a zero-length string, the data-entry person can indicate that the social security number does not exist.
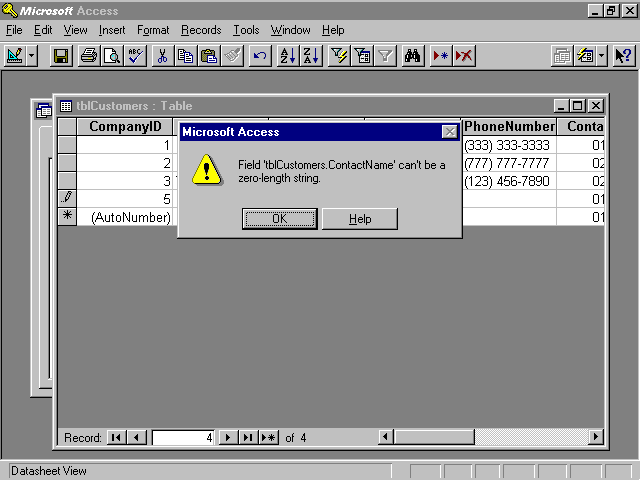
[ic:example]Add a new field called ContactName. Set the Required property for the field to Yes. Attempt to add a new record and enter two quotes ("") into the ContactName field. You should receive the error message shown in Figure 3.18. Return to the design of the table. Change the Allow Zero Length Property to Yes. Go to Datasheet view and try to enter two quotes into the ContactName field. This time you should be successful.
Figure 3.18. The result of entering "" when the Allow Zero Length property is set to No.
The final property is Indexed. Indexes are used to dramatically improve performance when the user searches a field. It is generally best to err in the direction of including too many indexes rather than too few.
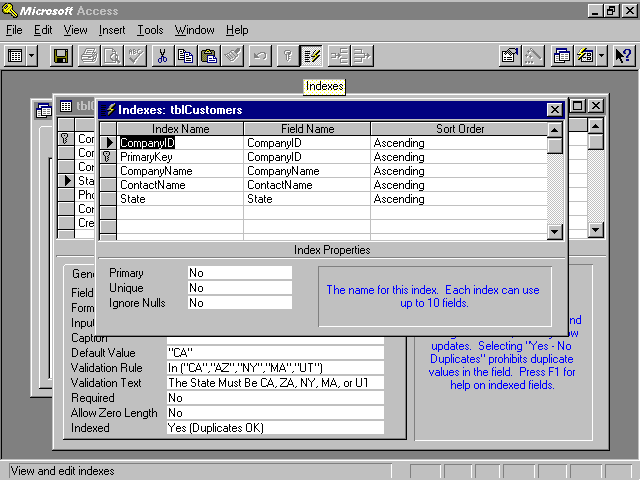
[ic:example]Set the Indexed property of the CompanyName, ContactName, and State fields to Yes - (Duplicates OK). Click on the Indexes button on the toolbar. Your screen should look like Figure 3.19. Notice the Index Name of PrimaryKey. This is the name for the Primary Key index. Note that the Primary and Unique properties for this index are both set to True.
Figure 3.19. The Indexes window shows you all of the indexes defined for a table.
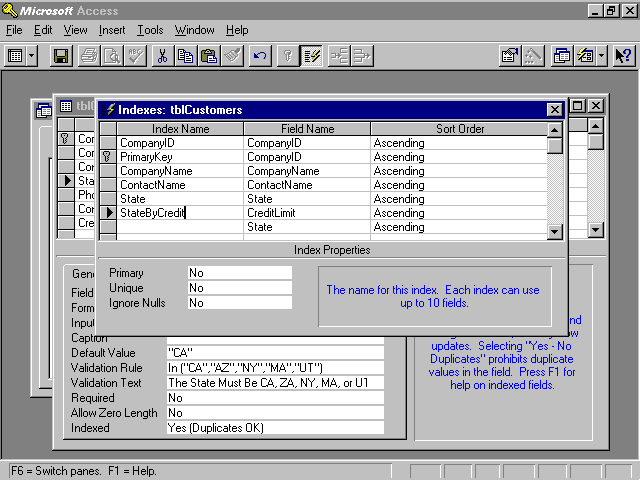
Figure 3.20. A multifield index called StateByCredit, based on a combination of the CreditLimit and State fields.
The most important index in a table is called the Primary Key index. This index ensures uniqueness of the fields that make up the index and also provides a default order for the table. It is mandatory that you set a primary key for the fields that participate on the one side of a One-to-Many relationship. To create a Primary Key index, select the fields that you want to establish as the primary key and then click on the Primary Key button on the toolbar.
Using the Lookup Wizard, you can instruct a field to look up its values in another table or query or from a fixed list of values. You can display the list of valid values in a combo or list box. A lookup is generally created from the foreign key (many side) to the primary key (one side) of a One-to-Many relationship.
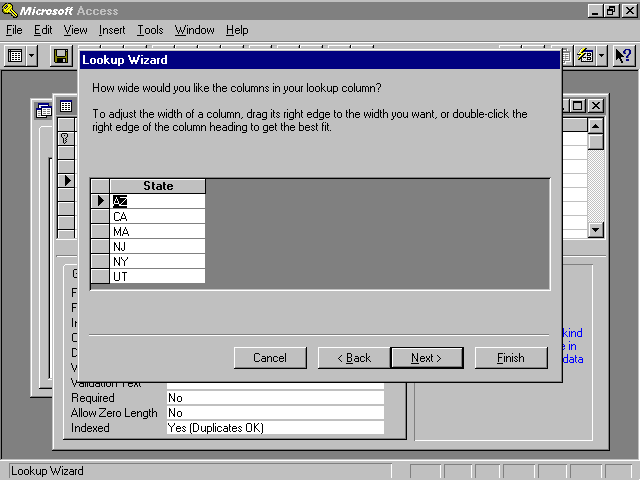
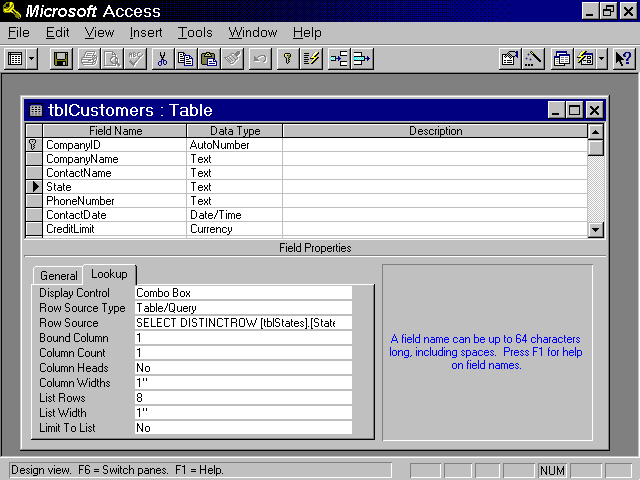
The Lookup Wizard can be invoked by selecting Lookup Wizard from the list of data types for the field. The first dialog of the wizard asks whether you want to look up the values in a table or query, or whether you want to input the values. I recommend that you always look up the values in a table or query. This makes your application extremely easy to maintain. The second dialog of the wizard asks you to indicate the table or query that will be used to look up the values. Select a table or query and click Next. The third dialog appears. This step of the Lookup Wizard asks you which field in the table or query will be used for the lookup. The fourth step of the Lookup Wizard, shown in Figure 3.21, gives you the opportunity to control the width of the columns in your combo or list box. Finally, the wizard allows you to specify a title for your combo box. When you click Finish, all the appropriate properties are filled in by the wizard. These properties appear on the Lookup tab of the field (see Figure 3.22). The Display Control property is set to Combo Box, indicating that a combo box will be used to display the valid values. This occurs whether the user is in Datasheet view or within a form. The Row Source Type indicates that the source for the combo box is a table or query. The Row Source property shows the actual SQL Select statement used to populate the combo box. Other properties show which column in the combo box is bound to data, how many columns are in the combo box, the width of the combo box, and the width of each column in the combo box. These properties are covered in more detail in Chapter 6, "What Every Developer Needs to Know About Form Basics."
Figure 3.21. The Lookup Wizard's adjust field width step.
Figure 3.22. The Field properties set by the Lookup Wizard.
Table properties allow you to specify properties that apply to the table as a whole. To access them, click on the Properties button on the toolbar while in the Design view of a table. The available table properties are shown in Figure 3.23. The Description property is used mainly for documentation purposes. The Validation Rule property is used to specify validations that must occur at a record level rather than a field level. For example, a different credit limit might exist depending on the state that a customer is in. In that case, what is entered in one field is dependent on another field. The validation rule might look something like this:
[State] In ("CA","NY") And [CreditLimit]<=2500 Or _

     [State] In ("MA","AZ") And [CreditLimit]<=3500
Figure 3.23. Viewing the available Table properties.
This validation rule requires a credit limit of $2,500 or less for California and New York and a limit of $3,500 or less for Massachusetts and Arizona. It does not specify a credit limit for any other states. Table-level validation rules cannot be in conflict with field-level validation rules.
The Validation Text property determines the message that appears when the user violates the validation rule. If left blank, a default message appears.
The Filter property is used to indicate a subset of records that appears in a datasheet, form, or query. The Order By property is used to specify a default order for the records. The Filter and Order By properties are not generally applied as properties of a table.
As mentioned in the section on the Indexed property, indexes can help you to dramatically improve the performance of your application. You should create indexes on any fields you sort, group, join, or set criteria for. Queries can greatly benefit from indexes, especially when created for fields included in your criteria, fields used to order the query, and fields used to join two tables included in the query. In fact, you should always create indexes for fields on both sides of a join. If your users will be using the Find dialog, indexes can help to dramatically reduce the search time. Remember, the only downsides to indexes are the disk space that they require and the small amount of time it takes to update them when adding, deleting, and updating records. You should always perform benchmarks with your own application, but you will probably find indexes helpful in almost every situation.
Let's design a few of the tables needed by the computer consulting firm's time and billing application. You will build tblClients and tblProjects. The table tblClients will be the main table for the application. It will be used to track the key information about each client. The second table, tblProjects, will be used to hold all the key information that the user needs to store on the projects they are working on for each client. Table 3.2 shows the field names, data types, and sizes for each field in tblClients. You should include indexes for all fields except Notes. Table 3.3 shows the properties that need to be set for these fields. Table 3.4 shows the fields, data types, and sizes for the fields in tblProjects. Table 3.5 shows the properties that need to be set for these fields. You should include indexes for all fields except ProjectDescription.
Field Name |
Data Type |
Size |
|
ClientID |
AutoNumber |
4 |
|
CompanyName |
Text |
50 |
|
Address |
Text |
255 |
|
City |
Text |
30 |
|
StateProvince |
Text |
20 |
|
PostalCode |
Text |
20 |
|
Country |
Text |
20 |
|
ContactFirstName |
Text |
30 |
|
ContactLastName |
Text |
50 |
|
ContactTitle |
Text |
50 |
|
OfficePhone |
Text |
30 |
|
Fax |
Text |
30 |
|
Cellular |
Text |
30 |
|
Home |
Text |
30 |
|
EMailAddress |
Text |
30 |
|
ReferredBy |
Text |
30 |
|
AssociatedWith |
Text |
30 |
|
IntroDate |
Date/Time |
8 |
|
DefaultRate |
Currency |
8 |
|
Notes |
Memo |
- |
Field Name |
Property |
Value |
|
ClientID |
Caption |
Client ID |
|
ClientID |
Set as primary key | |
|
CompanyName |
Caption |
Company Name |
|
CompanyName |
Required |
Yes |
|
StateProvince |
Caption |
State/Province |
|
StateProvince |
DefaultValue |
CA |
|
PostalCode |
Caption |
Postal Code |
|
ContactFirstName |
Caption |
Contact First Name |
|
ContactLastName |
Caption |
Contact Last Name |
|
ContactTitle |
Caption |
Contact Title |
|
OfficePhone |
Caption |
Office Phone |
|
OfficePhone |
Input Mask |
!\(999\)000\-0000 |
|
Fax |
Input Mask |
!\(999\)000\-0000 |
|
Cellular |
Input Mask |
!\(999\)000\-0000 |
|
Home |
Input Mask |
!\(999\)000\-0000 |
|
EMailAddress |
Caption |
E-Mail Address |
|
ReferredBy |
Caption |
Referred By |
|
AssociatedWith |
Caption |
Associated With |
|
IntroDate |
Caption |
Intro Date |
|
IntroDate |
Default Value |
=Date() |
|
IntroDate |
Validation Rule |
<=Date() |
|
IntroDate |
Validation Text |
Date Entered Must Be On Or Before Today |
|
IntroDate |
Required |
Yes |
|
DefaultRate |
Caption |
Default Rate |
|
DefaultRate |
Default Value |
125 |
|
DefaultRate |
Validation Rule |
Between 75 an 150 |
|
DefaultRate |
Validation Text |
Rate Must Be Between 75 and 150 |
Field Name |
Data Type |
Size |
|
ProjectID |
AutoNumber |
4 |
|
ProjectName |
Text |
50 |
|
ProjectDescription |
Memo |
- |
|
ClientID |
Number (Long) |
4 |
|
PurchaseOrderNumber |
Text |
30 |
|
ProjectTotalEstimate |
Currency |
8 |
|
EmployeeID |
Number (Long) |
4 |
|
ProjectBeginDate |
Date/Time |
8 |
|
ProjectEndDate |
Date/Time |
8 |
Field Name |
Property |
Value |
|
ProjectID |
Caption |
Project ID |
|
ProjectID |
Set as primary key | |
|
ProjectName |
Caption |
Project Name |
|
ProjectName |
Required |
Yes |
|
ProjectDescription |
Caption |
Project Description |
|
ClientID |
Caption |
Client ID |
|
ClientID in tblClients |
Set lookup to ClientID | |
|
ClientID |
Required |
Yes |
|
PurchaseOrderNumber |
Caption |
Purchase Order Number |
|
ProjectTotalEstimate |
Caption |
Project Total Estimate |
|
EmployeeID |
Caption |
Employee ID |
|
ProjectBeginDate |
Caption |
Project Begin Date |
|
ProjectEndDate |
Caption |
Project End Date |
The remainder of the tables needed by the time and billing application are listed in Appendix A. The completed table structures can be found in CHAP3.MDB. This file, and all files referred to in this book, can be found on your sample code CD.
Tables are the foundation for your application. A poorly designed table structure can render an otherwise well-designed application useless. This chapter began by walking you through several alternative methods for creating tables. It then discussed theoretical issues such as selecting the correct field type and effectively utilizing field properties. Each property and its intended use was discussed in detail. Finally, table properties and indexes were covered. After reading this chapter, you should be ready to harness the many features that the Access table designer has to offer.
![]()
![]()
![]()
![]()
![]()