| home Java Script MS Access Perl HTML Delphi C ++ Visual Basic Java CGIPerl MS Excel Front Page 98 Windows 98 Ms Word Builder PHP Assembler Link to us Links |
This hour's lesson takes a short break from the theory you've seen for the past few lessons. In this lesson you will put some of the code you've seen into a fairly large application and run the application to work with the results. You've already learned a lot about Visual Basic. Nevertheless, as this lesson illustrates, you've got a lot of exciting things yet to learn over the next few lessons.
This lesson's primary goal is to refresh your Visual Basic knowledge once again by putting together the big picture. In this lesson you'll build a simple but complete application just to get practice working with both code and the controls you've learned so far. Once you refresh your application-building skills in this lesson, the next lesson teaches more controls from the toolbox. The more controls you learn to use, the more powerful your applications become.
The highlights of this hour include
The previous lesson describes how to compute compound interest using a For loop. You studied the code in the previous lesson, and this lesson will build a simple application around that interest calculation.
NOTE: In creating an application from scratch, this hour lets you review the application, controls, form, and standard modules. Therefore, when the next lesson begins to teach some more advanced controls, you'll be better prepared for them.
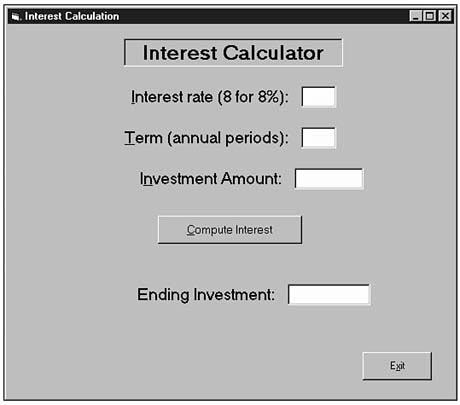
Figure 9.1 shows the running application that you'll create here.
Figure
9.1. The interest calculating application's
window.
Perform these steps to create the interest calculating application:
NOTE: The StartUpPosition property makes the Form Layout window unnecessary in most cases. StartUpPosition gives you much more accurate placement of the form than the Form Layout window.
This is a great time to introduce a new concept called control arrays. A control array is a group of more than one control of the same control type. You will better understand control arrays after you learn about data arrays in Hour 10, "List Boxes and Data Lists," but the interest rate application makes this a great project to introduce them.
Notice that the interest calculator's Term and Investment Amount labels and text boxes all look similar to the Interest rate label and text box you just placed on the form. All the font information and Height properties are the same. Therefore, while you could enter the remaining labels and text boxes, you can utilize the Windows Clipboard to make the job go faster.
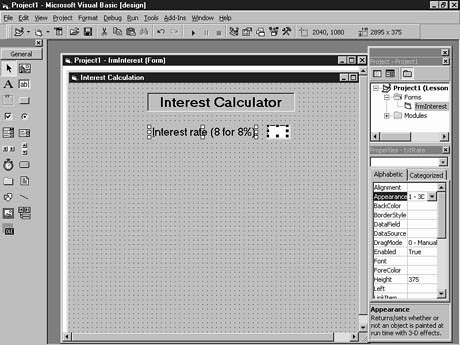
Highlight both the existing Interest rate label and text box. You can select multiple
controls by pressing the Ctrl key while you click on each control, or you can lasso
the controls by dragging a rectangle around the two controls. When you select both
controls, sizing handles appear around them, as shown in Figure 9.2.
Figure
9.2. The sizing handles show that two
controls are selected.
Select Edit|Copy to copy the selected controls to the Windows Clipboard. Now select Edit|Paste, and Visual Basic pops up a warning dialog box that reads You already have a control named `txtRate'. Do you want to create a control array?
A control array is a set of multiple controls that have the same name. You distinguish between the controls inside the array with an index value. For this particular example, you should not create a control array (you will create one in the next lesson). Therefore, answer No to the dialog box and again answer No when Visual Basic asks you about creating a control array for the text box.
NOTE: Visual Basic saw that you wanted to paste two controls on the form that already had controls with those same names. Visual Basic cannot replace existing controls when you paste new ones with the same name, so Visual Basic guessed (in this case incorrectly) that you wanted to add a control array named txtRate. When you refused the control array, Visual Basic made up its own name for the new label (Label1) and the new text box (Text1).
Move the pasted label and text box to their correct positions under the first pair and set these properties for the label: Name: lblTerm, Caption: &Term (annual periods):, Left: 2040, Top: 1800, and Width: 2895. The Height and Font properties are already correct because you borrowed these properties from the control you originally copied from. Set these properties for the text box: Name: txtTerm, Left: 5160, ToolTipText: Number of periods, Top: 1800, and Width: 615. As you can see, you don't have to set as many properties when you paste from an existing similar control.
New Term: Default properties are the properties Visual Basic assumes if you omit the properties from a control inside the Code window.
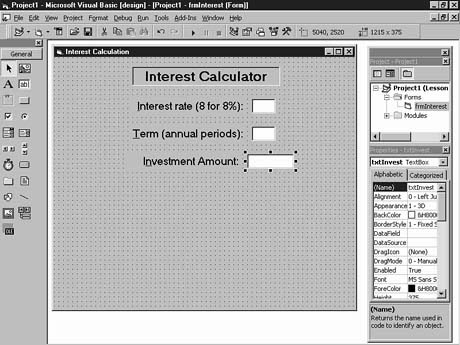
Click the form and select Edit|Paste once more (the Clipboard still holds those first two controls you sent there), refuse the control array, and set the following properties for the new label: Name: lblInvest, Caption: I&nvestment Amount:, Left: 1920, Top: 2520, and Width: 2895. Set the text box's properties to Name: txtInvest, Left: 5040, ToolTipText: Money you invested, Top: 2520, and Width: 1215.
Your screen should look something like Figure 9.3.
Figure
9.3. Proper form design takes a while.
You can quickly finish the form now. While the label and text box still reside on the Windows Clipboard, this would be a good time to add the Ending Investment label and text box. Select Edit | Paste once again and set the pasted label's properties as follows: Name: lblEnding, Caption: Ending Investment:, Left: 1800, Top: 4560, and Width: 2895. Set the text box's properties as follows: Name: txtEnding, Left: 4920, Locked: True, TabStop: False (so the user cannot send the focus to this text box), Top: 4560, ToolTipText: Compounded Investment, and Width: 1455.
The new property you set just now is the Locked property. When you lock a control, Visual Basic allows no user editing of the control. Therefore, the code beneath the form can modify the text box's Text property but the user cannot. The final text box will be a holding place for the calculated compound investment amount, so the user should not be allowed to edit the control even though it's a Text Box control.
NOTE: You might wonder why the application uses a text box and not a read-only control such as a label. The Label control would work just as well and would not require a Locked property setting because labels can never be changed by the user. Nevertheless, the text box keeps a uniform appearance throughout the form, so we're using a text box here.
Add a command button named cmdCompute, add the caption &Compute Interest, and add a ToolTipText value of Click to compute final investment. Place and size the command button as follows: Height: 495, Left: 2640, Top: 3360, and Width: 2535. Add a final command button named cmdExit to the lower-right corner with the E&xit Caption property.
NOTE: See, building an application can be tedious, but your productivity is greater with Visual Basic than with virtually every other application development system available. Although you've seen most of this lesson's concepts before, this is the first lesson that truly ties things together by walking you through the entire application-creation process.
Often, programmers run their applications as they build them despite the fact that no code exists yet to make the application do real work. You should be able to run your application now to make sure that the labels and text boxes all look correct. Check out the tooltip text to make sure you've entered the text properly. Click the toolbar's End button to stop the program so that you can add the final code.
The code is going to borrow a bit from the interest calculation routine you learned about in Hour 8, "Visual Basic Looping." You'll have to modify the routine somewhat so the data comes from the Text Box controls you've set up. You want the calculation to take place when the user clicks the center command button, so add the following code to the command button's Click() event procedure. Double-click the Form window's Compute Interest command button to open the cmdCompute_Click () event procedure to complete the code that follows:
Private Sub cmdCompute_Click()
` Use a For loop to calculate a final total
` investment using compound interest.
`
` intNum is a loop control variable
` sngIRate is the annual interest rate
` intTerm is the number of years in the investment
` curInitInv is the investor's initial investment
` sngInterest is the total interest paid
   Dim sngIRate As Single, sngInterest As Single
   Dim intTerm As Integer, intNum As Integer
   Dim curInitInv As Currency

   sngIRate = txtRate.Text / 100#
   intTerm = txtTerm.Text

   curInitInv = txtInvest.Text
   sngInterest = 1#   ` Begin at one for first compound

   ` Use loop to calculate total compound amount
   For intNum = 1 To intTerm
      sngInterest = sngInterest * (1 + sngIRate)
   Next intNum

   ` Now we have total interest,
   ` calculate the total investment
   ` at the end of N years
   txtEnding.Text = curInitInv * sngInterest
End Sub
NOTE: This is basically the same code that you saw in the previous lesson when studying For loops. This code does include a few minor differences so that the application's control names properly initialize and receive values.
TIP: Visual Basic supports default properties for most controls. The default property is the property Visual Basic uses if you don't explicitly specify a property. For example, if you use a Text Box control in code and don't type the Text property, Visual Basic assumes you mean Text (as long as you don't specify a different property). Therefore, the first assignment in the application is now sngIRate = txtRate.Text / 100#, but the following statement is identical in every respect because Visual Basic assumes that you are using the text box's Text property: sngIRate = txtRate / 100#.
You must also add the terminating code for the Exit command button. Here's a simple way the Code window lets you add new procedures:
Add the following code for the command button's event procedure:
Private Sub cmdExit_Click()
   ` Unload the form and terminate application
   Unload frmInterest
   End
End Sub
The Exit command button's Click event procedure contains a statement you've not seen until now. The Unload statement unloads a form from memory. If the form to unload is currently displayed, Visual Basic removes the form and returns all of the form's control values back to their design-time state.
In most cases the Unload statement is unnecessary, especially when your application contains only a single form. If you add multiple forms to the application, however, the user could have closed one of the Form windows (by clicking the form's window close buttons), and the End statement could fail to release that form's resources properly.
The Unload statement lets you use a shortcut that looks like this:
Unload Me
Me is a special object that refers to the currently active form. Use Unload Me when the application contains only a single form if you don't want to type the full form name. For a multiple-form application, however, be sure to unload all the forms before terminating the program.
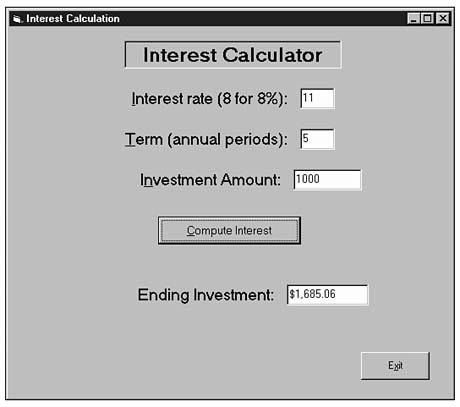
Run your application and enter some sample values. Figure 9.4 shows the application
with some sample data entered for a five-year investment. As shown in Figure 9.4,
if you invested $1,000 today at 11% interest, in five years you will have approximately
$1,685.
Figure
9.4. The running application computes the final investment amount.
The application is not really complete and ready for distribution. Although you've mastered the mechanics of this simple application, more is needed to make the application professional. Obviously, the ending investment's decimal place precision is far too high.
You need to format the value shown in the Ending Investment text box. When you format a value, you don't change the value, but you change the value's look. Visual Basic includes a built-in function called Format() that formats numeric and string values so you can display such values as dollars and cents, area code formats, or whatever formats you want to use. Although Hour 14, "Built-in Functions Save Time," explains Format() in detail, you can use the Format() function now to spruce up your application.
New Term: To format is to change the way a value appears to the user.
At the end of the cmdCompute_Click() event procedure, change the ending investment's assignment to this:
txtEnding.Text = Format(curInitInv * sngInterest, "$###,##0.00")
TIP: Some formats get lengthy, so programmers often declare a string variable and assign the format to the variable. They then use the variable inside the Format() function instead of using the string literal for the format. If you use the same format in several locations within the code, the variable means less typing on your part, and if you ever change the format, you only have to change the format in one place.
The Format() function's basic format is this:
Format(expression, strFormat)
Visual Basic changes the look of expression to match that of the format string you supply. Therefore, the format string "$###,##0.00" instructs Visual Basic to display the value with a dollar sign, floating numbers with the # (if the number is less than $100,000.00 the numbers will move left to touch the dollar sign instead of leaving a gap for the missing digits), commas in the amount if the amount is over $1,000, and a decimal point with two decimal places showing. If the value happens to be $0.00, the zeros ensure that the value prints, whereas if you used a # in place of each 0, the # would show nothing if the result were zero.
Once you format the value and rerun the application with the numbers used earlier,
you'll see a result that looks better, as Figure 9.5 shows.
Figure
9.5. The Format() function improved
the output.
A big problem still exists with the application if you plan to distribute it to others. The problem is not in the logic or in the calculation or in the form. The problem is the application's lack of error checking. If the user does not enter a value in one or more of the text boxes, the calculation will not work properly. Even worse, an error such as a divide by zero error could occur and stop the running program. Mathematically, one cannot divide by zero, and Visual Basic stops the program and issues a runtime error message if a divide by zero occurs. Any time you write an application that performs division, you should check to make sure that you never divide by zero.
Therefore, you'll need to add error checking to the application to make sure the user enters positive values greater than 0 in each of the text boxes before clicking the computational command button.
The error checking can be fairly simple. Convert the text box values to numbers, and if any text box contains zero or less, perform the following:
Several approaches exist for handling this error. The approach this lesson uses is slightly advanced, but it gives you a chance to see an external standard module added to an application (an external code module that is different from the form module), and you'll get a glimpse of the function-writing instruction you'll learn in Hour 13, "Modular Programming." You will actually create your own function instead of using one of the built-in functions supplied with Visual Basic.
First, assign the hook to the other function in your cmdCompute_Click() event procedure like this:
Private Sub cmdCompute_Click()
` Use a For loop to calculate a final total
` investment using compound interest.
`
` intNum is a loop control variable
` sngIRate is the annual interest rate
` intTerm is the number of years in the investment
` curInitInv is the investor's initial investment
` sngInterest is the total interest paid
   Dim sngIRate As Single, sngInterest As Single
   Dim intTerm As Integer, intNum As Integer
   Dim curInitInv As Currency

   ` Error-checking
   If ErrorCheck() = 1 Then
     Exit Sub
   End If

   sngIRate = txtRate.Text / 100#
intTerm = txtTerm.Text
NOTE: The rest of the procedure is identical to the earlier listing. You only need to add the four lines that follow the variable declarations.
The ErrorCheck() is a procedure you'll add that checks the form for bad values. You will add this procedure in a separate module, not at the bottom of the form module. Notice that you use the ErrorCheck() procedure just as you use built-in functions: You call the function with an empty argument list (no arguments are necessary), and the function returns a value. If that value is 1, the form contains an error, so you use the Exit Sub statement to terminate the event procedure and return the user to the form. (The previous lesson described other forms of the Exit statement such as Exit For.) If no error exists, the ErrorCheck() procedure will not return a 1, and the processing continues as normal.
New Term: A function procedure is a procedure that you write that accepts zero or more arguments and returns a single value.
New Term: A subroutine procedure is a procedure that you write that accepts zero or more arguments but does not return a value.
You must now add the ErrorCheck() procedure. Unlike the event procedures you've been writing until now, the ErrorCheck() procedure is a function procedure and not a subroutine procedure. A function procedure always returns a value, whereas a subroutine procedure never returns a value. (Again, you'll learn more about function and subroutine procedures in Hour 13.)
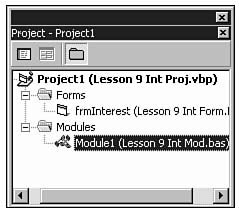
To add an extra module to your project, perform these steps:
Figure 9.6. You've now added another code module to the project.
Type the following function procedure inside the new module's Code window:
Public Function ErrorCheck() As Integer
` Error-checking for the form
If Val(frmInterest.txtRate.Text) <= 0 Then
intPress = MsgBox("Enter a value for the rate", vbCritical)
frmInterest.txtRate.SetFocus
ErrorCheck = 1
Exit Function
End If
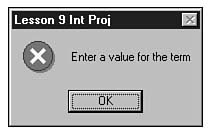
If Val(frmInterest.txtTerm.Text) <= 0 Then
intPress = MsgBox("Enter a value for the term", vbCritical)
frmInterest.txtTerm.SetFocus
ErrorCheck = 1
Exit Function
End If
If Val(frmInterest.txtInvest.Text) <= 0 Then
intPress = MsgBox("Enter a value for the investment", vbCritical)
frmInterest.txtInvest.SetFocus
ErrorCheck = 1
Exit Function
End If
` No error occurred if execution gets here
ErrorCheck = 0
End Function
The first difference you'll notice between the function procedure and the event subroutine procedures you've seen so far is the difference between the opening and closing statements. The keyword Function distinguishes the function procedure from a subroutine procedure. The procedures you've seen until now were subroutine procedures that used the Sub keyword to define them. In addition, the function procedure's opening line ends with As Integer. This qualifier tells Visual Basic that the function procedure will return an integer value. Functions can return any data type as long as you define the function to return the proper data type with the As keyword.
The function then checks each text box on the form. All form references include the form name! Therefore, instead of referring to the interest rate text box as txtRate, the code qualifies the text box with a form name as follows: frmInterest.txtRate. You've got to remember that an external standard module, such as this one, is not part of a form's code found in the form module. A standard module might need access to several forms in the same project, so the standard module needs the qualifying form name before each control name.
Once a text box is found to hold a bad value, a message box describes the problem. The module then sets the focus to that control. Therefore, the focus goes straight to the problem so the user can edit the control without having to find it first once the error message box goes away.
WARNING: SetFocus is not a property or an event. SetFocus is known as a method. Controls usually support all three: properties, events, and methods. A method is a built-in routine attached directly to a control. In a way, the control executes its own method. You'll append method names to the end of a control as done here. Read the methods from right to left to understand them fully. For example, frmInterest.txtTerm.SetFocus tells Visual Basic to set the focus on the control named txtTerm located on the frmInterest form.
Finally, the code sets the function's return value to 1 if an error occurs and exits the function (and therefore the module) and returns the return value to the calling code, which is the form module. To return a value from a function procedure, you simply assign the value that you want to return to the function name.
Figure 9.7 shows the message box that appears if the user enters a term value
that's zero or less.
Figure
9.7. The user must enter better data.
Save your project (Lesson 9 Int Proj would be a good name). When you save the project, Visual Basic asks for a form name and a module name as well (use Lesson 9 Int Form and Lesson 9 Int Mod to follow the naming convention that this 24-hour tutorial uses).
This hour develops a complete application. Through the development process, you saw how even a simple project can require detailed components such as error checking and proper form management. Too many books rush to the theory without hands-on work or rush to the hands-on without explaining the process. This lesson gives your 24-hour tutorial a needed boost with both hands-on development that strengthens what you already knew and some new topics to consider such as function procedures and form placement.
The next hour describes important list-based controls. You'll learn how to produce drop-down list boxes and how to initialize and work with such lists.
The quiz questions and exercises are provided for your further understanding. See Appendix C, "Answers," for answers.
lblTitle = "The Sound of Multimedia"

lblTitle.Caption = "The Sound of Multimedia"
![]()
![]()
![]()
![]()