| home Java Script MS Access Perl HTML Delphi C ++ Visual Basic Java CGIPerl MS Excel Front Page 98 Windows 98 Ms Word Builder PHP Assembler Link to us Links |
This hour's lesson pinpoints the concepts you learned in the previous hour. You will analyze a sample program in depth to learn more about how a Visual Basic application's components work together to form one executable program. Although this lesson might raise a few more questions than it answers, that's good! You need this overall walkthrough before you get your hands dirty with Visual Basic in Hour 3, "Controls and Properties."
Don't worry, this lesson is not all theory and description! The final part of this lesson walks you through the building of a complete Visual Basic application. A little help from the VB Application Wizard will go a long way.
The highlights of this hour include
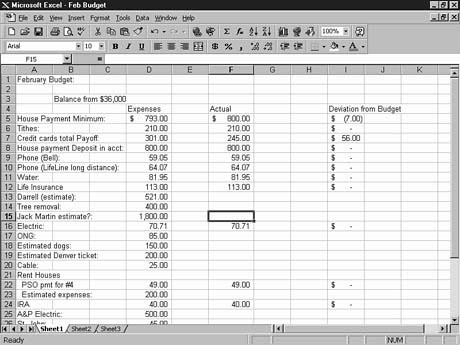
Lots can happen when a Windows program executes. For example, consider Figure
2.1's Microsoft Excel screen. What can happen next? What exactly will the user at
the keyboard do? The user might click a toolbar button. The user might select a menu
option. The user might press F1 to get help. The user might scroll the window. The
user might enter additional numbers or formulas. The user might edit existing worksheet
cells. The user might switch to another program. The user might....
Figure
2.1. A Windows program never knows what
will happen next.
In the old days of programming, less than a decade ago, before windowed environments became so popular, the program dictated what the user could next do. The program might ask the user a question, and the user could answer the question and nothing else until the question was answered. The program might display a menu of options. Although the user had the choice of options, the user only had the choice of a menu selection. If the user wanted to move to another part of the program, he could not unless such a move was part of the currently displayed menu.
The multitasking, multiuser windowed environments changed everything. Today's Windows program has no idea what might happen next. The program must offer a plethora of choices that range from menu options to various controls and data-entry locations, and the program just has to wait and see what happens.
New Term: An event is something that happens, usually but not always due to the user at the keyboard, during a program's operation.
When the programs lost control, users gained. Users can now perform any one of many tasks. The problem for the programmer is responding to users' actions when so many actions are possible. Fortunately, Microsoft designed Windows to be elegant not only for the user but for the programmer as well. When virtually anything happens in the Windows environment, Windows generates an event. An event might be a keypress, an internal clock tick, a menu selection, a mouse click, a mouse movement, a task switch, or one of many hundreds of other possible events.
Your program does not have to wait around for the user to do something specific. In text-based programming days, you would write one big program that guided the user through the execution of the code step-by-step. The program would take the user to a menu, ask the user questions, and offer only a limited set of choices. In many ways, a Visual Basic program is nothing more than a collection of small routines. These routines, called event procedures, handle individual events. If and only if an event occurs for which you've written an event procedure does that event procedure execute. You don't have to do anything special to execute the event procedure--just write the code. In other words, your program responds to events by supplying a matching event procedure and your program ignores events if you've not written an event procedure.
Every control you place on a form supports one or more events. For example, if you place a text box in the center of the Form window and run the program, you can click the text box, enter text in the text box, double-click the text box, and ignore the text box. The Text Box control happens to support events that can recognize when you've done anything to the control.
If you've written an event procedure for that text box's event, your code's instructions will execute automatically as soon as the event occurs. Therefore, if you've written code to blank out the text box as soon as the user clicks the text box and you've written another event procedure for the double-click event that fills the text box with X's when the user double-clicks the text box, the text box fills with blanks or X's when you run the program and click or double-click the text box.
NOTE: You'll see plenty of examples in this and subsequent lessons that demonstrate the nature of event procedures.
Perhaps the best way to begin learning about application creation with Visual Basic is to analyze one of the sample applications that comes with Visual Basic. You will gain some practice working within the development environment and you will master the various windows quickly.
To begin, perform these steps:
Although only a single filename appears in the Open Project dialog box, several files actually reside in the Vcr folder. Visual Basic knows, however, that when you select File | Open Project, you want to open a project and not another kind of file, so Visual Basic displays only project files in the dialog box. All project files end with the .VBP filename extension to distinguish them from form files that end with the .FRM extension and module files that end with .BAS (other Visual Basic file types exist, but we won't cover them here).
The advantage that projects present to the Visual Basic programmer is that a project is a bookkeeping record of the entire collection of files that comprise an application. When you write even a simple Visual Basic application, Visual Basic creates a project for that application so that, as the application's functionality grows, the project can track all the files related to that project. No matter how many files go with a project, when you open the project, Visual Basic puts the project's files at your fingertips in the Project window.
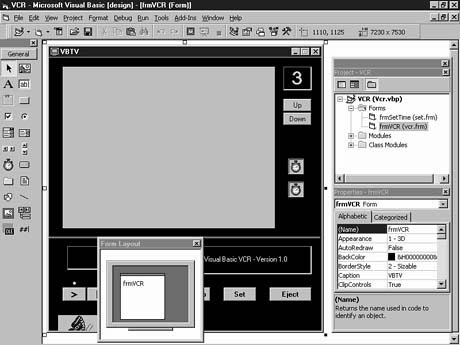
Double-click the Vcr.vbp project file now. Double-click the form named frmVCR in the Project Explorer window if you don't see VCR in the Form window. Your development environment changes dramatically to hold the project, as shown in Figure 2.2.
As you might guess from the name of the project and from the window in front of
you, this application simulates a television playing a videotape. Click any plus
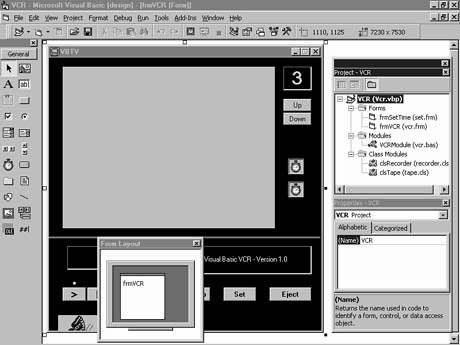
signs you see in the Project window to expand the list to look like Figure 2.3. You
now know that this application is a collection of five files: two forms, a module
file, and two class files. Actually, a sixth file goes with the project: the Vcr.vbp
project file itself, which Visual Basic keeps track of and updates as needed.
Figure
2.2. The Vcr.vbp project.
Figure
2.3. The Project file lists the contents
and filenames.
The Project window describes two important aspects of a VB project: the external disk drive filenames for each project file and the internal names used inside the project. For example, the current form open in the Form window is named frmVCR. You know this because VB's title bar names the file currently showing at the top of your screen and also shows that the file is a form and not another kind of file.
To every area of your project, the form is called frmVCR. This form got its name because the program writer named the form frmVCR. As you'll see throughout this tutorial, programmers often precede items they name with a three-letter abbreviation for the object being named. Thereafter, when you look through a list of object names, you'll know just from the names what the names represent.
The form is not stored on the disk drive under the name frmVCR, however. As the Project window's parentheses show, the form named frmVCR is called vcr.frm on the disk. Rarely will the actual filename match that of the internal name used in the project. In a way, the three-letter abbreviated prefix works a lot like the three-letter filename extension in that the prefix describes the type of object.
The naming rules for internal Visual Basic names differ from those of files. Therefore, you will need to give each object you create in the Project window both a filename and an internal VB name. If you don't supply a name, Visual Basic supplies one for you, but Visual Basic is not good at assigning names to objects. VB would be happy calling every command button on your form Command1, Command2, and so on. When you name command buttons, however, you'll make up names that better match their meaning, such as cmdOK and cmdExit.
As you create applications and add to them objects such as forms and modules, you will have to come up with lots of names so that both you and Visual Basic can distinguish one object from another. Unlike filenames, a name of a Visual Basic object must begin with an alphabetic character and can contain letters and numbers, but it cannot contain periods or certain other special characters. You can mix uppercase and lowercase as much as you wish. The illegal period is the primary reason why internal object names differ from filenames.
Generally, as stated previously, programmers prefix a name with letters representing the kind of object they are naming. The prefix is often stated in lowercase letters and the rest of the name often appears as a combination of uppercase and lowercase letters, with the uppercase letters helping to separate parts of the name. clsTape is the name of one of the class files (this book does not dive too deeply into classes, although you'll learn some about them as you go along), and cls indicates that the file is a class file and Tape is the rest of the name to help describe the contents of that file. (Notice that the programmer did not precede the VCRModule file with mdl or mod and that doing so would better describe the file's module type.)
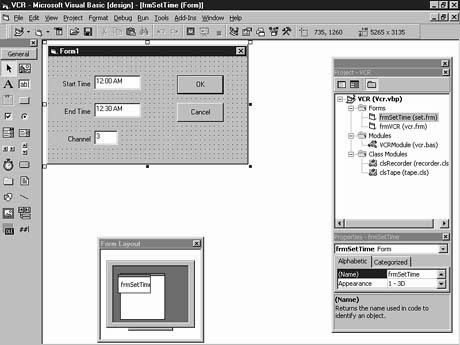
Double-click the form named frmSetTime. The form named frmSetTime
appears in your Form window, replacing the previous form, as shown in Figure 2.4.
Figure
2.4. A different form now appears in the
Form window.
Display frmVCR form once again. Look at the Form Layout window to determine where the form will appear on your screen when you run the application. The next section explains how to run the application.
You learned in Hour 1, "Visual Basic at Work," that you can execute a Visual Basic application by running the application or by first compiling the application and then running the executable compiled program. For the majority of your VB training, you'll run applications from within the Visual Basic development environment without taking the time to compile the application first. Usually, compilation is the last step a programmer makes before distributing the application to other users.
Generally, and for all of this tutorial, you'll run your applications from within the Visual Basic development environment. When you run within the development environment, you gain all kinds of advantages that your users will not need. You can stop the program in midstream and analyze values (using the debugging tools available in the development environment), you can start and stop your program at any point, you gain access to the source code faster each time you stop the program, and the program's startup is faster than having to wait on the compiler.
TIP: When you are ready to distribute your application, select File | Make to start the compilation process.
Although several ways exist to run the program, the easiest is to press F5, the accelerator key for the Run | Start menu option. (A Start toolbar button also gives you quick access to the application's startup.)
NOTE: Right before starting the application, take a quick look at the Form Layout window. Notice where the primary frmVCR appears relative to the rest of the screen. When you start the application, the Form Layout window will prove to be correct; the Form window appears right where the Form Layout window showed.
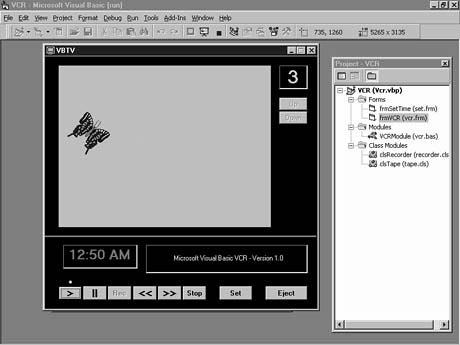
Press F5 now to see the running application. The application contains VCR-like
buttons at the bottom of the form. Click the Play button (>) to watch Figure 2.5's
butterfly fly across the television screen. When you change channels, the television
screen color changes, but the flying butterfly is the only program you can see. Click
Set to see the second Form window and click Eject to close the program.
Figure
2.5. Running the application.
Now that you've seen the Form Layout window in action, consider closing the window. You'll rarely use it and it gets in the way most of the time. You can control the exact twip location where a form first appears through code, and the Form Layout window is nice just for testing purposes most of the time.
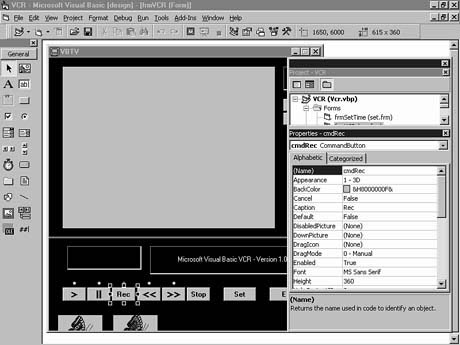
When you close the Form Layout window, you'll have a better view of the form. Notice all the buttons, windows, text, lights, stopwatch symbols, and butterfly graphics you see on the form. All these objects are controls the programmer got from the toolbox.
WARNING: Don't confuse the Toolbox window with the toolbar. The toolbar is the row of buttons that mimics certain menu options and appears directly beneath the menu bar. The Toolbox window holds your tools, a collection of controls that you place on forms.
Click one of the buttons once to see that button's properties appear in the Properties
window. Figure 2.6 shows the Properties window for the record button labeled Rec.
Each button supports a unique set of properties to differentiate the button from
surrounding buttons. For example, the record button is named cmdRec (the
cmd prefix stands for command button) and has a Caption property
value of Rec but the Stop button is named cmdStop and has a Caption
property of Stop. Although many of the two buttons' properties are identical,
the differences set them apart, as you can see when you scroll through the Properties
window.
Figure
2.6. The Rec command button's Properties
window.
This lesson began by describing code and event procedures in detail, and yet not a word has been mentioned about that in several pages. The code is there, as you can see from the Project Explorer window. Actually (ignoring the class files for now), this application contains three sets of code!
Controls cannot have the same name if you place them on the same form, but two forms might contain controls with the same name. A control name goes with its parent form. For example, an application might contain an About dialog box and a form that displays account information. Both forms can have a command button named cmdExit that closes the form's window. Each form contains its own code, called the form module, that manages and responds to the controls on that form. You won't always put code in a form's form module, but you very frequently will.
The Project window's Modules entry also is a file with code in it. A module file that lies outside a form module is often called a standard module. You'll place event procedures for forms in the forms' form modules, and you'll place common routines that work on all the forms in a standard module file that lies outside the form module but still in the project.
TIP: As you write more code, you will write routines that you want to use again, such as special calculations that are unique to your business. By storing these general-purpose routines inside modules instead of embedding them in form modules that go with specific applications, you can copy and load the standard module into multiple applications so that you don't have to type the general-purpose code more than once. Therefore, once you've written a useful procedure that calculates or processes data outside the form's boundaries, you can reuse that code and insert the code into other projects as long as you keep the routines in a standard module file.
New Term: You enter, edit, and view the language of VB in the Code window.
Visual Basic always presents you with code in the window. A Code window acts a lot like a simple text editor or word processor. You can insert, delete, copy, cut, and paste text. Despite the graphical nature of applications and the controls, the code you write to tie things together is still in text.
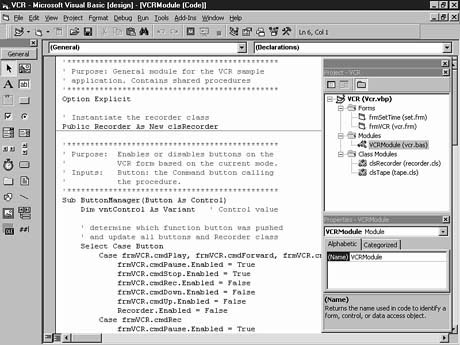
Take a brief look at the application's single module's Code window by double-clicking
the Project window's VCRModule entry. Visual Basic opens the module's Code
window, as shown in Figure 2.7.
Figure
2.7. The module's Code window.
Code appears in the Code window in various colors to indicate the purpose of the code. As you learn the Visual Basic language, you will better understand why some code is green and some black. Scroll down through the Code window. Don't worry about understanding much or anything about the Code window at this time. As you can see, much of the Code window contains English words, but the structure might seem completely odd if you've never programmed before. By the time you finish this 24-hour tutorial, you will understand the entire program and be able to speak the Code window's language fluently!
Close the module's Code window for now. To close the window, you can click the window's (not VB's!) close button or double-click another object in the Project window such as the primary form named frmVCR. However you close the window, make sure that you see the VCR form before you start the next section.
Visual Basic makes it easy to locate event procedure code for controls on forms. Double-click any control to see one of its event procedures. For example, if you double-click the command button labeled Up, Visual Basic opens the Code window and places the text cursor in the set of lines that Listing 2.1 shows.
Private Sub cmdUp_Click()
    ` if in range, set the channel number
    If vntChannel < 13 Then
        vntChannel = vntChannel + 1
    Else
        vntChannel = 2
    End If

     ` assign the channel variable to the display
     lblChannel.Caption = vntChannel
End Sub
New Term:Wrapper lines are the first and
last lines of a procedure.
Don't sweat the details, but get familiar with the overall event procedure. Most event procedures begin with the statement Private Sub and end with End Sub. The Private-End block (a block is a section of code that goes together as a single unit) illustrates the first and last lines of the event procedure. The lines between these wrapper lines comprise the body of the event procedure.
All controls have unique names, as you saw earlier. All event procedures also have unique names. An event procedure name always takes this form:
controlName_eventName ()
WARNING: The parentheses are not actually part of the name. Some procedures require values inside the parentheses while others do not. Even if an event procedure requires nothing inside the parentheses, the parentheses are still required.
The event procedure always consists of the control name, an underscore, and the procedure's event name. Therefore, if you want to respond to both the click and double-click events that might be applied to the command button named cmdUp, you would have to write an event procedure named cmdUp_Click() and one named cmdUp_DblClick().
You don't have to memorize that the double-click event is named DblClick and that a keypress event is named KeyDown. The top of every Code window contains a drop-down list box that contains every event possible for the control listed in the right-hand drop-down list box. The left-hand list box holds the name of every control on the form that this form module goes with. Again, do not get too bogged down in details because when it is time to use these drop-down list boxes to select events, this lesson describes the process in detail.
The naming convention for the event procedure is not up to you, but up to Visual Basic. In other words, the Click event procedure for a command button named cmdTest will always have to be cmdTest_Click(). The two-part name makes the event procedure extremely specific; from the name both you and Visual Basic know that the code executes only if the user clicks the command button named cmdTest.
This might be a good time to review properties. When the programmer (you!) places controls on a form, the programmer generally sets many of the control's property values at that time in the Properties window. A programmer might then write the event procedure code for the control or the programmer might place additional controls on the form and write event procedures later.
Many of the properties in the Properties window show up immediately, during design time, as you assign the properties. In other words, if you place a command button on a form and immediately click the Properties window's Caption property and type Click Here, the command button instantly reads Click Here in the Form window.
The event procedure code, however, does not do anything until runtime. The instructions you learn to place in the event procedures will not execute until the application's user runs the program and triggers events at runtime. The Properties window often reacts at design time, whereas the Code window often reacts at runtime.
Enough already! How about a little fun? You can create your very first Visual Basic application without knowing any more than you know now about Visual Basic. The secret is Visual Basic's VB Application Wizard, a wizard that generates an application for you based on your responses to a series of dialog boxes.
New Term: A skeleton program is a program shell that you must fill in with specific code.
WARNING: The application that the VB Application Wizard generates is known as a shell or skeleton. The application will not do much. For example, how can the VB Application Wizard create a real estate analysis application for you and know all the details and processing requirements and calculations that you might require? The VB Application Wizard's purpose is to build only a shell by following your guidelines. The shell is just a program structure that executes but contains no specific functionality. The shell contains a menu, a toolbar, and several other features, but these features are more like placeholders for you until you get around to editing the generated application to make the application perform a specific task that you need done.
Despite the ease with which you can generate an application with the VB Application Wizard, this book does not revisit the VB Application Wizard after this section. You need to get well grounded in Visual Basic before you will really understand how to add to the shell and change the shell to suit your needs. Therefore, the VB Application Wizard arguably benefits the experienced Visual Basic programmer more than the beginning programmer because the experienced programmer will be more able to decipher the generated shell and add specifics to make the program operate as needed.
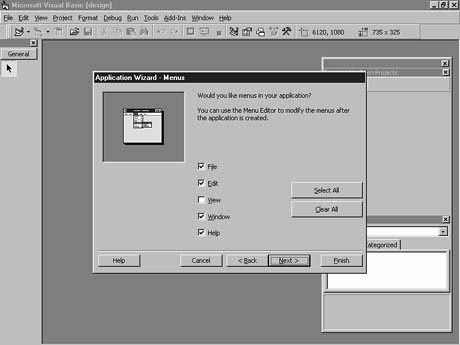
Perform these steps to generate your first Visual Basic application with the VB Application Wizard:
Figure 2.8. Selecting the menu items you want to place in the final application.
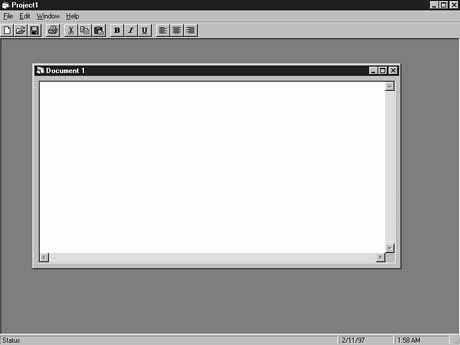
Figure
2.9. The wizard generated a working, albeit
plain, application.
The generated program looks somewhat like a word processor because of the large editing
area in the center of the screen. Try the menus and click the toolbar buttons. Things
look good. You will find that the application does not respond to your keystrokes
as you might expect, however. If you select and attempt to cut, copy, or paste (despite
the toolbar and menu items that represent those tasks), either nothing happens or
a small dialog box appears, telling you what you requested (such as the paste command)
but doing nothing about the request.
You must remember that it's not the wizard's job to generate a fully working application that performs specific tasks. The wizard's job is to construct a general application to which you can later add the specifics. As you learn more about Visual Basic, you will better appreciate how much time and effort the VB Application Wizard saves you because the simple task of adding a standard menu and toolbar buttons can take an afternoon. The generated application is a great starting point for your own applications once you and Visual Basic become better acquainted.
You've just created your first application! Actually, you got a little help from your friend the VB Application Wizard, but that's okay. You are now beginning to understand how a Visual Basic application's components fit together. The events that the user triggers are often related directly to your application's forms or controls, and you now know where to place the code that handles the important events.
The next hour takes a small step backward and lets you begin to create an application from scratch without the help of the wizard. You will better learn how the toolbox and Properties window interact and support each other's activities.
The quiz questions and exercises are provided for your further understanding. See Appendix C, "Answers," for answers.